


28 AR400 Series Router
613-000313 Rev D
Installing the Router in a Rack
4. Gather additional items. You will need:
• the rack-mount kit included in the router package
• a Phillips #1 screwdriver
• screws and cage nuts to attach the brackets to your rack
5. Check the rack.
Ensure that the rack is safely secured and that it will not tip over. Devices in a
rack should be installed starting at the bottom, with the heavier devices near the
bottom of the rack.
Ensure the rack has sufficient space for the router and its associated cables. The
router is 1U high.
6. Unscrew the feet from the router.
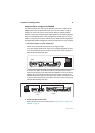
7. Connect the handles to the brackets.
Screw the handles to the wider side of each bracket, using the supplied screws.
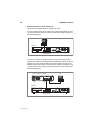
8. Connect the brackets to the router.
Screw the brackets to the sides of the router, using the supplied screws. The
router can be front or rear mounted.
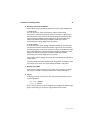
9. Mount the router in the rack.
Use appropriate rack mounting screws (not supplied).
Applying Power to the Router
1. Check the supply voltage and the router’s rated voltage.
The router is fitted with a universal mains power supply that will function over
the range 100 VAC to 240
VAC and 50 Hz to 60 Hz.
For continued protection against the risk of fire and shock hazard, replace fuses
only with fuses of the same type and rating.
Warning The specific power supply requirements for a particular model are
clearly displayed on the rear or underside of the router. If the supply is outside
the accepted range for the router, the router may not operate or damage to
the router may result.
2. Fit the power cord retaining clip to the AC power inlet on the router’s rear panel.