


AR750S-DP Secure VPN Router
10
Installing the Power Supply
Before installing a power supply:
■ gather the necessary tools and equipment
■ read the section “Using an AT-PWR03 Power Supply (PSU)” on page 9
1. Unpack the power supply unit.
Caution Follow correct anti-static procedures when installing a PSU. Failure
to do so could damage the PSU or router. If you are unsure about correct
procedures, contact your authorised Allied Telesis distributor or reseller.
While observing Electro Static Discharge (ESD) precautions, remove the
PSU from its packing material in an anti-static environment.
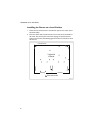
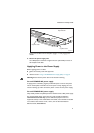
2. For AC power supplies, install the power cord retaining clip.
Fit the power cord retaining clip to the AC power inlet on the router’s rear
panel.
3. Remove the current power supply unit or blanking panel from the
router.
To remove the blanking plate, loosen the two captive Phillips screws until
they are free of the router. The screws fit a Phillips #2 screwdriver. Maintain
a hold on the blanking plate to avoid the plate falling once the screws are
fully loosened.
To remove a power supply unit, follow the instructions in the section
“Removing a Power Supply” on page 14.
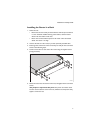
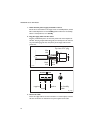
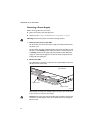
4. Insert the power supply unit into the router.
Caution Keep the PSU in straight alignment when inserting. Forcing a
misaligned PSU is likely to damage both the router’s chassis and the PSU.
Slowly and carefully slide the PSU into the power supply bay. The PSU must
be inserted the correct way up to engage with the router. The PSU handle is
close to the bottom edge of the router when inserted correctly. The
following figure shows which way up the PSU should be when inserting it.