


Quick Install Guide 9
Software Release 2.3.1
C613-04017-01 REV D
Using the GUI to configure a switch
The GUI can be accessed through the switch’s default VLAN (VLAN1). To
set-up the GUI the first time it is used, you must first access the CLI.
1. Access the CLI
Follow the instructions in the previous section: “Using the CLI to configure
a switch”.
2. Enable IP
At the CLI, enter the command:
ENABLE IP
3. Assign an IP address to VLAN1
Assign the VLAN1 interface an IP address in the required subnet, using the
command:
SET IP INTERFACE=vlan1 IP=ipaddress MASK=mask
4. Define a route (if required)
If the PC from which you will access the GUI is on a different subnet to the
switch, add a route from the PC to the switch. Enter:
ADD IP ROUTE=PC-ipaddress INTERFACE=vlan1
NEXTHOP=switch-ipaddress
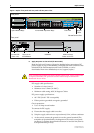
5. Connect the PC to a switch port
The PC can be connected directly, or through a LAN.
The PC should be running Internet Explorer 5.x or Netscape 6.2, with
JavaScript enabled. A copy of Internet Explorer can be found on the
Documentation and Tools CD-ROM that is bundled with your switch.
If you access the Internet through a proxy server, set your browser to
bypass the proxy for the IP address you just assigned to the VLAN1
interface.
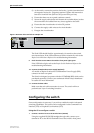
Point your web browser at the IP address of the VLAN interface.
6. Log in
At the log in prompt, enter the log in name and password.
User Name: manager
Password: friend
The system status page appears and you can now use the GUI to configure
the switch.
To ensure that configuration settings are saved correctly, use the GUI pages’ menus and
buttons to navigate, not your browser’s buttons.
As a security precaution, change the password as soon as possible.
To change the password, select Management > Users from the sidebar
menu. Select the Manager account and click Modify.
7. To access context-sensitive help
Click on the GUI Assistant Button [?] on each page.