


Specifications
Size: 120 x 120 x 25.4 mm
Rated Voltage: DC 12V
Operating Voltage: 10.2V ~ 13.8V
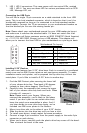
The front fan (optional) should be installed so that the air is blowing into the
case from the front. To install it:
1. Drop the fan into the cage and push it in until it snaps into place.
2. If you're using a 4-pin fan, connect a large 4-pin connector from the power
supply to the male 4-pin connector on the fan. If you're using a 3-pin fan,
connect the 3-pin connector to a motherboard fan header.
Chassis Air Guide
Your new case includes a chassis air guide and vents, for improved cooling of
your CPU and overall system. The air guide consists of three parts: an upper
duct, flange, and lower duct. If you prefer, you can adjust the distance between
the lower duct and your CPU for maximum cooling efficiency.
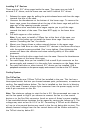
You can also install an 80mm intake fan between the
air guide and the case's side panel. This will further
improve your system's cooling airflow. To install the
optional fan:
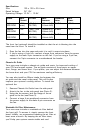
1. Remove Chassis Air Guide from the side panel
2. Attach the fan to the side panel (see Photo 2).
3. Using the fan screws, lock the flange of the air
guide to the fan (see Photo 3).
4. Connect a large 4-pin peripheral connector from
the power supply to the make 4-pin connector on
the fan.
Washable Air Filter Maintenance
Your new case includes a washable air filter behind
the front grill. To access it, simply remove the front
bezel. Initially, we recommend washing the air filter at
least once a month. By keeping the air filter clean,
you'll help your system remain stable and cool.
6
Photo 2
Photo 3
Speed Input
Current
Air Flow Static
Pressure
Acoustical
Noise
Input
Power
High
2000 RPM
0.24A
(max.)
2.24m
3
/ min
(79 CFM)
2.54mm-H2O
(0.10inch-H2O)
30 dBA 2.88 W
Medium
1600 RPM
0.2A 1.59m
3
/ min
(56 CFM)
2.54mm-H2O
(0.06inch-H2O)
28 dBA 2.4 W
Low
1200 RPM
0.13A 1.1m
3
/ min
(39 CFM)
0.92mm-H2O
(0.04inch-H2O
)
25 dBA 1.56 W