


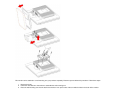
4. Insert the 4 screws into the holes and tighten.
5. Reconnect the cables. Refer to the user's manual that came with the optional wall mounting arm for instructions on attaching it to the wall.
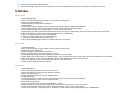
5. Drivers
Windows 2000
1. Start Windows® 2000
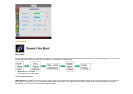
2. Click on the 'Start' button, point to 'Settings', and then click on 'Control Panel'.
3. Double click on the 'Display' Icon.
4. Select the 'Settings' tab then click on 'Advanced...'.
5. Select 'Monitor'
- If the 'Properties' button is inactive, it means your monitor is properly configured. Please stop installation.
- If the 'Properties' button is active. Click on 'Properties' button. Please follow the steps given below.
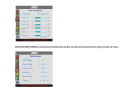
6. Click on 'Driver' and then click on 'Update Driver...' then click on the 'Next' button.
7. Select 'Display a list of the known drivers for this device so that I can choose a specific driver', then click on 'Next' and then click on 'Have disk...'.
8. Click on the 'Browse...' button then select the appropriate drive F: ( CD-ROM Drive).
9. Click on the 'Open' button, then click on the 'OK' button.
10. Select your monitor model and click on the 'Next' button.
11. Click on the 'Finish' button then the 'Close' button.
If you can see the 'Digital Signature Not Found' window, click on the 'Yes' button.
Windows ME
1. Start Windows® Me
2. Click on the 'Start' button, point to 'Settings', and then click on 'Control Panel'.
3. Double click on the 'Display' Icon.
4. Select the 'Settings' tab then click on 'Advanced...'.
5. Select the 'Monitor' button, then click on 'Change...' button.
6. Select 'Specify the location of the driver(Advanced)' and click on the 'Next' button.
7. Select 'Display a list of all the drivers in a specific location, so you can choose the driver you want', then click on 'Next' and then click on 'Have Disk...'.
8. Click on the 'Browse...' button, select the appropriate drive F: ( CD-ROM Drive) then click on the 'OK' button.
9. Click on the 'OK' button, select your monitor model and click on the 'Next' button.
10. Click on 'Finish' button then the 'Close' button.
Windows XP
1. Start Windows® XP
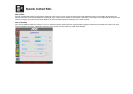
2. Click on the 'Start' button and then click on 'Control Panel'.
3. Select and click on the category 'Printers and Other Hardware'
4. Click on the 'Display' Item.
5. Select the 'Settings' tab then click on the 'Advanced' button.
6. Select 'Monitor' tab
- If the 'Properties' button is inactive, it means your monitor is properly configured. Please stop installation.
- If the 'Properties' button is active, click on 'Properties' button.
Please follow the steps below.
7. Click on the 'Driver' tab and then click on 'Update Driver...' button.
8. Select the 'Install from a list or specific location [advanced]' radio button and then click on the 'Next' button.
9. Select the 'Don't Search. I will choose the driver to install' radio button. Then click on the 'Next' button.
10. Click on the 'Have disk...' button, then click on the 'Browse...' button and then select the appropriate drive F: (CD-ROM Drive).