


1.0 Introduction
Bits & Pieces Technology is pleased to introduce you to RocketChip — the
most advanced single—chip accelerator available for the Apple II, II Plus, IIe
and IIc computer marketplace. It does not require cables, slots or a
complicated installation procedure. RocketChip does speed up program execution
from all memory locations (64k or 128k), 1.6 Megabytes of auxiliary memory,
expansion ROMs, and peripheral board ROMS, while retaining normal game
paddle/joystick operation and offering you the choice of normal or unique game
play sounds
2.0 RocketChip Features
* Operates from 5MHz to 50KHz — 5 times faster than normal Apple speed
to 20 times slower than normal Apple speed of lMHz.
* Requires very little power - Less than l00mA
* Easy to install and does not require a slot.
* Standard power—up configuration or can be programmed by the user.
* Keyboard selectable special features
* Emulation of AE Transwarp speed setting protocol.
* Accelerates all memory locations:
*System memory (64k or 128K)
*Auxiliary memory up to 1.6 Megabytes
*Expansion ROMs.
*Peripheral card ROMs.
* Accelerates all 80 column operations
* Non-standard configurations of the RocketChip registers are retained
until the power is turned off.
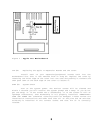
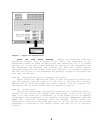
3.0 RocketChip Installation Procedure
The installation of RocketChip into your Apple computer is an easy
procedure when you follow the steps outlined in this section. If you have an
Apple II, II Plus, or IIe the installation steps are detailed in Section 3.1.
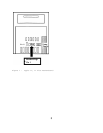
If you have an Apple IIc, the installation requires disassembly of the
computer case, the removal of the 65C02 microprocessor and replacement with
the RocketChip. The Apple IIc installation steps are detailed in Section 3.2.
If you do not feel comfortable disassembling the Apple IIc, please refer to
your dealer for additional assistance.
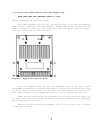
You will need the following tools to install your RocketChip;
1 IC chip puller tool or a small flatbladed screwdriver
1 Medium Phillips screwdriver - For Apple IIc installation
3