


******************************************************************
Warning
Turn OFF the AC power switch on your Apple computer. Leave the AC
power cord connected to the wall outlet and the computer.
Attempting to install RocketChip with the power applied can cause serious
damage to your Apple computer and to RocketChip. Bits & Pieces Technology,
Inc. will not assume responsibility for damage caused by improper installation
or handling.
******************************************************************
3.1 RocketChip Installation for the Apple II, II Plus, and IIe
MAKE SURE THAT THE COMPUTER POWER IS “OFF”
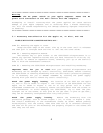
STEP #1: Removing the Apple II Cover
Grasp the back edge of the cover. Lift up on the cover until it releases
and then pull it straight back and lift it off. Set the cover aside.
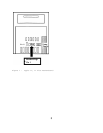
STEP #2 : Removing Expansion Boards
The easiest way to gain access to the 6502/65C02 microprocessor is to
remove any optional expansion boards that you have installed in slots #2, #3,
#4, and #5. To remove an expansion board, carefully pull up on the board to
free it from the motherboard connector.
STEP #3 : Removing the 6502/65C02 Microprocessor and Installing RocketChip.
Important Note for you to read: Both your original microprocessor and
RocketChip can be damaged by static electricity, 6502/65C02, before touching
the 6502/65C02 or removing RocketChip from the anti—static protective package,
it is necessary for you to GROUND YOURSELF by touching the power supply
housing with your hand to remove any static electricity.
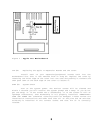
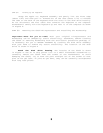
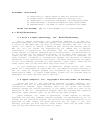
Touch the power Supply housing. The location of the 6502 for the Apple
II, and II Plus is shown in Figure 1. The location of the 6502/65C02 for the
Apple IIe is shown in Figure 2. Use an IC chip puller tool or a small
flatbladed screwdriver to carefully remove the 6502/65C02 from the socket on
the motherboard. To avoid damaging the 6502/65C02, try to work the part
straight out of the socket so that pins do not get bent. If pins do get bent,
they can be carefully straightened with long nose pliers.
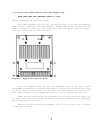
Touch the power supply housing. Remove the Rocketchip from the
protective package. Look at either Figure 1 (II, II Plus) or Figure 2 (IIe)
and install Rocketchip in the motherboard socket as shown. Before pushing
RocketChip fully into the socket, make sure that Pin #1 is oriented correctly
and that all 40 pins of the RocketChip are properly aligned in the socket and
that they are not bent.
4