


2-162-16
2-162-16
2-16
Chapter 2: Basic installationChapter 2: Basic installation
Chapter 2: Basic installationChapter 2: Basic installation
Chapter 2: Basic installation
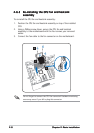
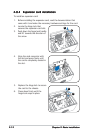
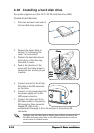
2.10 Installing a hard disk drive
The system supports one Ultra ATA/133 IDE hard disk drive (HDD).
To install a hard disk drive:
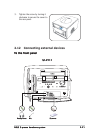
1. Drive two screws in each side of
the hard disk drive as shown.
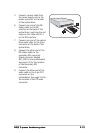
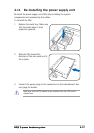
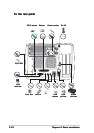
5. Connect one end of the 40-pin
IDE cable to the IDE connector
on the drive.
6. Connect a 4-pin power plug from
the power supply unit to the
HDD power connector.
7. Connect the other end of the
IDE ribbon cable to the primary
IDE connector (blue connector
labeled PRI_IDE) on the
motherboard. See page 3-8 for the location of the primary IDE
connector.
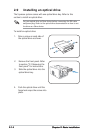
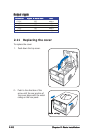
2. Remove the cover. Refer to
section “2.4 Removing the
cover” for instructions.
3. Position the hard disk drive at
the bottom of the drive bay,
then slide it inside.
4. Push in the direction of the
arrow until the clamp snaps to
secure the four screws you put
in earlier.
Configure your hard disk drive as Master device before connecting the
IDE cable and power plug. Refer to the HDD documentation on how to
set the drive as a Master device.
3
4
HDDHDD
HDDHDD
HDD
labellabel
labellabel
label
sideside
sideside
side
ClampClamp
ClampClamp
Clamp
5
6