


41
ASUS Xonar D2
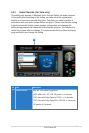
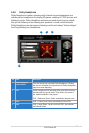
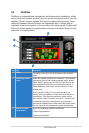
4 Recording Selector
button
Click this button to select the path/source you are going to
record. Please note that the recording function on Windows
is a one-path selector. So, you can select only one default
recording source at a time. You may have to restart the
recorder program if you switch to a different source. (Note:
On Vista, some application programs may allow you to
select the recording device/path in the recording programs
themselves.)
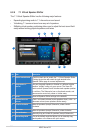
5 Recording Volume
Slider
Drag this slider down to decrease the recording volume; drag
up to increase the recording volume. The tool-tip reveals the
percentage number from 1 to 100 in terms of the full scale
level.
6 Left/Right Balance
This horizontal slider controls the volume between the left
and right channels.
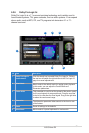
7 Reset
Reset all volume controls to the default settings
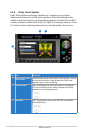
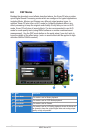
8 S/PDIF-In Advanced
Setting
Click this button to open the advanced settings for the
S/PDIF-In:
Enabling “Validity Check” will check out the PCM audio
validity bit of S/PDIF input stream to prevent recording or
monitoring non-PCM/not recordable audio (such as AC3,
etc.), which will become unrecognizable sounds from your
speakers.
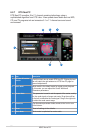
9 Microphone-In
Advanced Setting
Click this button to open the advanced settings for the
Microphone-In:
Enabling “Microphone Boost” will increase a volume gain
to boost microphone input signals. For typical low-cost PC
microphone, it’s recommended to enable this function.