


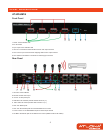

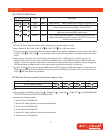
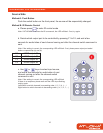
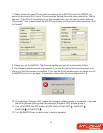

DIP SWITCH
SW1-SW4 for EDID/Audio
DIP Switch Position Video Audio Description
Pin#1 Pin#2
OFF OFF 1080p Stereo
1
Default Mode
2
– 1080p & stereo audio output for most HDTVs
OFF ON 720p
1080i
Stereo Safe Mode
3
– Enforce the system output at 720p/1080i video and
stereo audio for basic compatibility among HDTVs
ON OFF Bypass
4
Bypass EDID Learning Mode
5
– for learning EDID from the display while
playing any received HDMI audio format
ON ON Bypass Stereo EDID Learning & Stereo Mode5 – for learning EDID from the
display while enforcing stereo output if any HDTV cannot play
surround sound normally
Note:
1
If the HDTV shows video but without audio, please try to set audio mode to stereo.
2
Factory default of SW1-SW4: Pin#1-OFF & Pin#2- OFF for 1080p with stereo.
3
If you encounter any unsolved audio/video output problem during system installation, please turn any SW1-SW4
to Pin#1-OFF & Pin#1-ON , for safe mode to enforce the most compatible 720p stereo output for system
check.
4
Bypass means the matrix will maintain playing the original format of HDMI signals in video and audio. By
setting at this mode, the users may encounter compatibility issue among different kinds of HDMI sources and
displays. If you cannot get the audio and/or video output normally at the system installation, please change the
DIP switch setting to default mode or even safe mode to verify the functionality of the device.
5
Set Pin#1 at ON first then connect the HDMI Input to HDTV through a HDMI cable. Wait for 20 seconds. The
EDID learning procedure will be finished. If you want to learn the EDID from another HDTV, you must set Pin#1
at OFF first and repeat this procedure.
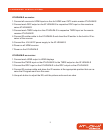
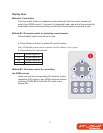
SW Main for firmware update (for technical support only)
DIP Switch Position Pin#1 Pin#2 Pin#3 Pin#4
Normal Operation Mode
6
OFF OFF ON OFF
Firmware Update Mode
7
ON ON OFF OFF
Note:
6
Factory default for SW Main: Pin#1-OFF , Pin#2-OFF , Pin#3-ON , Pin#4-OFF . PLEASE MAINTAIN
THIS SETTING AT ANYTIME FOR REGULAR USE!
7
Sequence for firmware update
1. Power off the AT-HD44M-SR.
2. Set the DIP switch position to Firmware Update Mode.
3. Power on the AT-HD44M-SR.
4. Power off the AT-HD44M-SR.
5. Set the DIP switch position to Normal Operation Mode.
6. Power on the AT-HD44M-SR.
6