


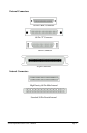

ATTO ExpressPCI Ultra2 User’s Manual Page 9
CHAPTER 4: HARDWARE INSTALLATION
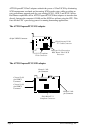
This chapter walks through the process of installing an ATTO ExpressPCI SCSI host
adapter and attaching your SCSI devices to it. Please note to get the best performance
from your ATTO ExpressPCI host adapters, use Ultra2/WIDE SCSI devices with the
ATTO ExpressPCI Ultra2 host adapters.
Before Installing your ATTO ExpressPCI SCSI Adapter
1. Plan your SCSI device connections.
If connecting both internal and external devices to the ATTO ExpressPCI SCSI
adapter, be sure to obtain the appropriate cabling to connect devices. Cables,
adapters and terminators are available through ATTO.
2. Set SCSI device termination.
Devices at both ends of the SCSI chain must be terminated. Refer to Chapter 3,
Cabling & Termination and your device documentation to determine SCSI device
termination. Devices in the middle of the chain, including the ATTO ExpressPCI
SCSI adapter, must have termination removed or disabled.
When using both internal and external devices attached to the ATTO ExpressPCI
Ultra2 SCSI host adapter, it will select proper termination for itself.
3. Set SCSI IDs.
Each device on the SCSI bus requires a unique SCSI ID. If installing a single device,
make sure you do not assign it the same SCSI ID as your ATTO ExpressPCI SCSI
adapter. The default setting for your ATTO ExpressPCI SCSI adapter is ID 7. It is
recommended this setting not be changed. In the event you need to change this
setting, refer to the Reconfiguring the ATTO ExpressPCI SCSI Bus section of the
ExpressPro-Tools user’s manual.
Please refer to your SCSI device documentation to determine the current SCSI ID and
how to change it. Wide (16-bit) SCSI devices can be assigned IDs 0-6 and 8 -15,
while Narrow (8-bit) SCSI devices can only be assigned IDs ranging from 0-6.