


16 17ULTRAGAIN DIGITAL ADA8200 Quick Start Guide
ULTRAGAIN DIGITAL ADA8200 Getting started
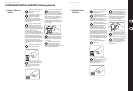
(EN) Step 3: Getting
started
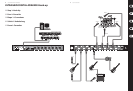
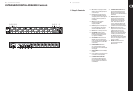
Connect microphone or instrument audio
sources to input channels 1-8.
Connect ADAT OUT to the ADAT IN on an
ADAT equipped audio device via TOSLINK
cable. The ADA8200 will provide
8additional channels of analog connectivity to a
digital mixer, digital recorder, or computer
audiointerface.
Adjust the word clock settings. If the
ADA8200 is the master word clock for the
digital recording system, setthe word
clock settings selector on the rear panel to MASTER
and designate the internal sample rate (44.1kHz or
48 kHz) setting. The SYNC MASTER and the SYNC
LOCKED LEDs on the front panel will illuminate. If the
ADA8200 is not the master word clock for the digital
recording system, set the word clock settings
selector on the rear panel to SLAVE and designate
the word clock source (ADAT IN or WC IN) setting.
The SYNC LOCKED LED will illuminate, when a valid
sync signal has been detected.
Press the POWER switch into the
onposition.
Press the +48 V PHANTOM POWER
button to engage phantom power when
using condenser microphones or active
directboxes.
Adjust the gain level of microphone and
instrument audio sources. Begin with the
GAIN knob turned to the counterclockwise
position. Bring the level up by turning the GAIN knob
clockwise. The SIG LED will illuminate. If the signal is
too high the CLIP LED will illuminate. If this occurs,
turn the GAIN slightly counterclockwise until the CLIP
LED no longerilluminates.
Connect ADAT IN to the ADAT OUT on an
ADAT equipped audio device via TOSLINK
cable. The ADA8200 will provide
8additional channels of analog output.
Connect analog outputs to additional
monitors for surround sound mixing or
connect to a separate mixer for additional
mixing capabilities.
(ES) Paso 3: Puesta en
marcha
Conecte las fuentes de audio del
micrófono o instrumento a los canales
de entrada 1 a 8.
Mediante un cable TOSLINK, conecte la
salida ADAT OUT al ADAT IN de un
dispositivo de audio ADAT. El ADA8200
brindará 8 canales adicionales de conectividad
analógica a un mezclador digital, a una grabadora
digital o a una interface de audio de computadora.
Ajuste las conguraciones del word
clock. Si el ADA8200 es el word clock
maestro del sistema de grabación
digital, ajuste el selector de conguraciones del
word clock en el panel trasero a MASTER y designe
la conguración de la frecuencia de muestreo
(44.1 kHz o 48 kHz). Los LED del SYNC MASTER y del
SYNC LOCKED en el panel frontal se iluminarán.
Si el ADA8200 no es el word clock maestro del
sistema de grabación digital, ajuste el selector de
conguraciones del word clock en el panel trasero
a SLAVE y designe la fuente de word clock
(conguraciones ADAT IN o WC IN). El piloto SYNC
LOCKED se iluminará cuando haya sido detectada
una señal de sincronización válida.
Presione el interruptor de POWER hacia
la posición ON.
Presione el botón +48 V PHANTOM
POWER para habilitar la energía
eléctrica cuando utilice micrófonos de
condensadores o cajas directas activas.
Ajuste el nivel de ganancia del
micrófono y las fuentes de audio del
instrumento. Comience girando la
perilla de GAIN en sentido anti-horario. Eleve el
nivel girando la perilla GAIN en sentido horario.
El LED SIG se iluminará. Si la señal es muy alta el
LED CLIP se iluminará. Si esto ocurre, gire el GAIN
levemente en sentido anti-horario hasta que el LED
CLIP deje de iluminar.
Conecte el ADAT IN al ADAT OUT de un
dispositivo de audio equipado con ADAT
mediante un cable TOSLINK. El ADA8200
suplirá 8 canales adicionales de salida analógica.
Conecte las salidas analógicas a
monitores adicionales para mezclas de
sonido envolvente o conecte a un
mezclador independiente para obtener
capacidades de mezcla adicionales.