


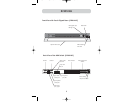


1. Remove the brackets from the box.
2. Align the bracket with the front of the Switch for flush installation in your rack.
3. Attach the bracket to the side of your Switch with the screws provided.
4. Mount the Switch to the rack rail assembly.
*** Cautions and Warnings ***
Before attempting to connect anything to the Switch or your computer(s), please
ensure that all your computer equipment and devices are powered off. Belkin
Corporation is not responsible for damage caused by your failure to do so.
Standalone Switch Installation
This section provides complete instructions for the hardware setup of a single Switch.
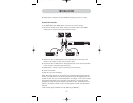
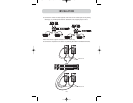
Connecting Computers to the Switch
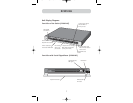
1. Attach the IEC power cable to the power connector located on the rear of the Switch.
2. Using an RJ45 CAT5 or CAT6 cable, connect to a free port on your KVM Switch.
3. Connect the other end of the RJ45 cable to an OmniView ENTERPRISE Series
Server Interface Module (Belkin part number F1DE101A-AP).
4. Connect the VGA and PS/2 connectors to the computer (make sure that you
connect the keyboard and mouse cables to the correct ports on your computer;
purple indicates the keyboard connector and green indicates the mouse connector).
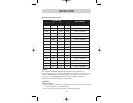
5. Set the video compensation switch to the appropriate position as described in the
chart below.
Note: If video resolution is poor, adjust the respective video compensation switch
+
1
position to improve.
10
INSTALLATION
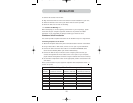
Initial switch position for video compensation
Length of Low resolution Medium resolution High resolution
CATX cable 640x480 to 1024x768 800x600 to 1600x1200 1024x1280 to 2048x1536
0-200 ft. Position 0 Position 0 Position 0
100-300 ft. Position 1 Position 1 Position 2
200-400 ft. Position 2 Position 4 Position 5
300-500 ft. Position 3 Position 5 Position 6
400-600 ft. Position 4 Position 6 Position 7
500-700 ft. Position 5 Position 6 Position 7
600-800 ft. Position 6 Position 6 Position 7
700-900 ft. Position 6 Position 6 Position 7
800-1000 ft. Position 7 Position 7 Position 7
P74342_F1DWXXXC_man.qxd 12/5/03 3:14 PM Page 10