


3- UK
Installation
Note: Before installation, please inspect the unit.
Make sure that nothing inside the package is damaged.
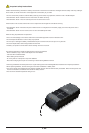
A. Connect to AC Utility Power
Plug in the AC cord to a wall socket. Please make sure there are no devices plugged into the unit. Check to see whether
the “SITE WIRING FAULT” indicator is lit. If it is lit, please have the utility wiring inspected by an electrician.
B. Charge the Battery
For best results, charge the battery for twelve hours prior to initial use. The unit charges its battery whenever it is
connected to the utility power.
C. Turn on the unit
Turn on your unit by depressing the “On/Off” button for approximately two seconds. You will see the green indicator
light come on.
D. Plug in Power Devices
Plug your devices into the AC sockets on the unit. To use the unit as a master on/off switch, make sure all of the
loads are switched on.
Caution: Never connect a laser printer or scanner to the backup sockets along with other computer equipment. A
laser printer or scanner draws significantly more power when in use than when idle. This may overload the Battery Backup.
E Connect the USB Communication Port
A USB port is provided to relay the signal to support Windows. To fully utilize the Belkin Automatic Power Management Software, you
will need to connect the unit to your computer. Connect the USB cable to the unit, then connect the other end to your computer’s USB
port.
F. Install Belkin APM Software
a) Platforms supported by Belkin APM Software.
The following operating system (OS) is arranged by the alphabetical order:
• AIX4.3.3,5.1,5.2
• CompaqTru64Alpha
• FreeBSDx86
• HP-UX11.x,11i.x
• Linux
• MacPPCOSX
• SCOUnixWare7.1.1,7.1.3,SCOUnix8.0,andSCOOpenServer5.0.6,5.0.7
• SGIIrix6.5.x
• Solaris/Sparc2.6,7,8,9,andSolaris/Intel2.6,7,8,9
• WindowsXP/2003/2000/ME/98/NT4.0(SP6).
b) Belkin Automatic Power Management Software Installation Steps. (For most common operating systems)
For Windows platform
• Runsetup.exeinthe\Windows\Disk1\InstData\VM\directoryofyourCDtostarttheinstallationprogram.
• Readtheinformationprovided,thenclickNext.
• Reviewtheinstallationoptionsthatyouhaveselected.Iftheoptionsarecorrect,thenclick“Install”tobegintheinstallation.
• Whentheinstallationprogramiscompleted,clickDone.
For Mac OS X platform
• Runsetup.appinthe\MacOXS\Disk1\InstData\directoryofyourCDtostarttheinstallationprogram.
• Readtheinformationprovided,thenclickNext.
• Reviewtheinstallationoptionsthatyouhaveselected.Iftheoptionsarecorrect,thenclick“Install”tobegintheinstallation.
• Whentheinstallationprogramiscompleted,clickDone.
Trouble shooting
PROBLEM POSSIBLE CAUSE SOLUTION
Power LED is not lit
unit will not power on
“On/Off” button not pushed or pushed
less than 2 seconds
Press the “On/Off” button button more than 2 seconds
Battery voltage is too low Recharge the unit for 24 hours
UPS fault Contact Belkin Technical Support at techsupp@belkin.com
unit always on battery mode Power cord loose Re-plug the power cord
AC breaker is tripped Reset the breaker
Power disturbances have occurred Normal operations
Backup time is very short Battery is not fully charged Recharge the unit for 24 hours
unit is overloaded Remove unnecessary power loads (devices
UPS fault Contact Belkin Technical Support at techsupp@belkin.com