


Hookup and Installation
Step 7
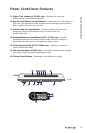
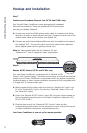
Connect your Broadband Ethernet Line (PF31L and PF40L only)
Your PureAV Power Conditioner comes equipped with broadband
Ethernet-line protection. These are standard RJ45 Ethernet jacks
and they are labeled “Network”.
A. Connect one end of an RJ45 network patch cable to a network jack (either
directly to a router or wired network wall jack). Connect the other end of the
network patch cable to the network jack labeled “IN”.
B. Connect one end of the broadband Ethernet cable (included) to the network
jack labeled “OUT”. Connect the other end of this cable to the networked
device (digital media receiver, gaming console, etc.).
Note: We have included labels for the “Network IN” and
“Network OUT” lines if needed for better organization.
Step 8
Remote AC/DC Control (PF31L and PF40L only)
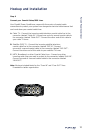
Your new Power Conditioner is equipped with a “Remote AC/DC
Control” jack (remote trigger). This allows you to power on and off the switched
outlets on your Power Conditioner via the power switch on another component
(receiver/preamp or other custom installation component) that is equipped with
a “trigger out” or remote output jack.
A. Before connecting the cable, make sure that the “Switched On” light is not
lit. If the “Switched On” light is lit, press the “Switched” button to turn off
the “switched” outlets.
B. Plug in the “Remote AC/DC Control” cable (1/8" mini-jack cable included) to
the corresponding remote input on the Power Conditioner (labeled as “AC/
DC IN 3~30V 10mA”).
C. Plug the other end of the “Remote AC/DC Control” cable into the
corresponding remote output on the component of your choice (this may be
a custom installation component, receiver/preamp, etc.).
Your Power Conditioner is now set up for remote operation.
PureAV Power Conditioner
11