


5
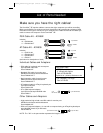
1. Set the DIP switches. If you have only one OmniView
™
SE, use the MASTER bank
setting. If the OmniView
™
SE you are using will be daisy-chained off another unit, use a
unique slave setting. Please refer to the next section for more information regarding
multiple OmniView
™
SE units.
PLEASE FOLLOW THIS INSTALLATION PROCEDURE EXACTLY. NOT DOING SO MAY
RESULT IN KEYBOARD AND/OR MOUSE ERRORS, OR FAULTY OPERATION.
WARNING: Before attempting to connect anything to the OmniView
™
SE or
the computers, make sure everything is powered off. Plugging and unplugging
cables may cause irreversible damage to your computers and the OmniView
™
SE.
Belkin Components will not be held responsible for damage caused.
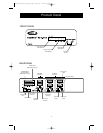
Hardware Installation
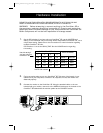
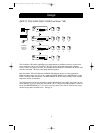
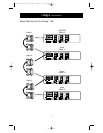
DIP SWITCH SETTINGS
1234
ON ON ON ON BANK 0 MASTER
ON ON OFF ON BANK 1 Slave
ON ON ON OFF BANK 2 Slave
ON ON OFF OFF BANK 3 Slave
BANK ADDRESS
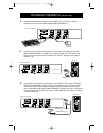
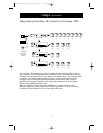
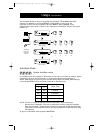
3. Connect the monitor to the OmniView
™
SE. Using the attached cable, or the one
included with your monitor, connect it to the HDDB15 female port on the back of the
OmniView
™
SE labeled with the monitor symbol at the CONSOLE section.
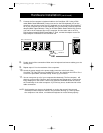
2. Find a convenient place to put your OmniView
™
SE. Take note of the length of your
cables so that your computers, OmniView
™
SE, keyboard, mouse, and monitor are
distanced properly.
Monitor
NOTE: ON is down
Use this setting if
you have only one
OmniView
™
SE
DIP switches 1 & 2 set the SCAN_TIME. See the USAGE section regarding
this setting.
P73039_F1D102-eng_man.qxd 9/26/00 3:42 PM Page 5