


15
INTERNET SHARER
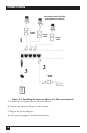
3.4 Installing the Internet Sharer in a PC Environment
Having previously confirmed that a direct connection from each PC to the Internet
works, connect each PC to the Internet Sharer using supplied serial cables and
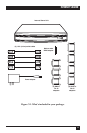
adapters. Connect the Internet Sharer’s MODEM port to the external modem
using the supplied Internet Sharer cable.
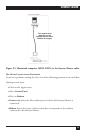
In order to be able to use the Internet Sharer, you must first connect it to your
computer’s serial port. Follow these steps:
• Turn OFF your PCs.
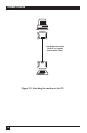
• Find the serial port on your PC’s back panel. Match the serial-port adapter
included in your Internet Sharer package to the serial port on your PC (DB25
or DB9). Plug the serial port adapter onto the PC’s serial port.
• Plug one end of the RJ-45-to-RJ-45 cable into the serial-port adapter, and the
other into the Internet Sharer’s PORT #1.
• To connect a second and third PC to the Internet Sharer’s PORT #2 and PORT
#3, respectively, follow steps above for each additional PC.
• Plug one end of the flat cable to the Internet Sharer MODEM port the other
end to the modem using the supplied DB25-to-RJ-45 connector and the
gender changer.
• Plug the included power supply into the power socket and the other end into
the Internet Sharer’s +9V power socket.
• Turn on the PCs, the Internet Sharer and the modem.
You are now ready to surf the Net using the Internet Sharer. Access the Internet
exactly as you normally would with your Internet dialer software.
If you have any problems, it is possible that some parameters have not been set
correctly. Make sure you’ve followed your Internet Service Provider’s directions for
setting up your dialer software. If you’re still having problems, see the
troubleshooting suggestions in Appendix B.