


ProImage
Plus3000/XL3000 PosterPrinter Helpful Tips Page 10
Printing with Print Artist
The Print Artist application has its own detailed user’s guide that explains how to create output on a standard
printer. The following section provides additional information about optimizing printing on your ProImage
Plus3000 or ProImage
XL3000 PosterPrinter System. Any questions regarding the operation of Print Artist
should be directed to the Technical Support Department at Sierra On-Line. Call 425.644.4343 or visit this Web site:
http://www.sierra.com.
Important tips
• Always print in portrait mode even if you have created your poster or banner in landscape. Your poster or
banner will print faster because it requires less temporary space on your hard drive.
• If your system crashes during printing, Windows
creates temporary files in your \Windows\System\Temp
directory with file names such as ~pXXXX.tmp. You must delete these files before using Print Artist again.
(An easy way to find these files is to search for *.tmp.)
Creating and printing a poster using Print Artist
You can choose from any of the Print Artist provided document types to print to your PosterPrinter (although
Signs and Banners are the best suited for printing in a large size). Because it is a specialty printer, none of these
document types are correctly sized for the ProImage
Plus3000 or ProImage
XL3000 PosterPrinter System, so
you may need to modify the settings slightly to achieve the results you want.
Basic steps for creating a poster in Print Artist
Follow these basic steps to create and print a poster from Print Artist to your PosterPrinter system.
1. Select the Signs document type, click on the desired category, select the desired layout, and click OK to open it.
2. Modify the layout as needed.
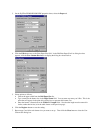
3. Select Print Setup from the File menu.
4. Select the FujiFilm PP3000 or the PP3000Wide print driver from the Specific Printer drop down list, click on
Options, ensure that the correct paper is selected and click OK.
5. Click OK again to exit Print Setup.
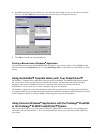
6. Select Print from the File menu, ensure that the preview shows the poster is fitting on one page, then click OK
to print.
The following sections offer more detail on each of the above steps:
Selecting a Standard Layout
Print Artist comes complete with pre-designed signs, templates or simply blank pages with which you can design
from scratch. These are referred to as standard layouts because they are designed in standard page sizes, such as
8½” x 11”. Later in this document, you will learn how to use custom (non-standard) sizes to create banners. Some
users may choose to modify existing layouts, while others may decide to create their own from scratch. Follow
these steps to open a layout:
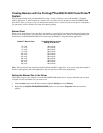
1. Select the Signs document type from the opening Print Artist screen or use the Select Document Type from
the File menu and click New. The Select New Sign dialog box appears.
2. Select your desired category from the Categories list. The associated layouts appear in the Layouts list.
3. Select the desired layout. A preview of the poster or template appears.
4. Click OK.