


ProImage
Plus3000/XL3000 PosterPrinter Helpful Tips Page 2
Creating Banners with the ProImage
Plus3000/XL3000 PosterPrinter
System
You can create banners with your PosterPrinter using a variety of software, such as the GalaRio™ Template
Gallery application. To print a banner of a specific size, you need to first set up that size in the Plus3000/XL3000
print driver. Once you set up a size, it is stored in the custom size list—when you want to use the size in the future,
you just need to select it from the list in the driver before printing.
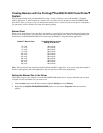
Banner Sizes
When you set up the banner size in the driver, the length you select needs to be shorter than the actual length of the
banner you’re going to print. The following chart lists some typical banner sizes and the corresponding length you
should choose in the Plus3000/XL3000 driver when using the GalaRio™ Template Gallery application.
GalaRio™ Banner Sizes Compatible Banner Length
Setting in the Driver
17" x 4 ft. 45.5 inches
17" x 5 ft. 57.5 inches
17" x 6 ft. 69.5 inches
17" x 8 ft. 93.5 inches
23" x 5 ft. 57.5 inches
23" x 6 ft. 69.5 inches
23" x 8 ft. 93.5 inches
29" x 6 ft. 69.5 inches
29" x 8 ft. 93.5 inches
36" x 6 ft. 69.5 inches
36" x 8 ft. 93.5 inches
Note: These sizes have been tested and verified with the GalaRio™ application. You can try using these lengths in
the driver when printing with other applications, but you may have to make some adjustments.
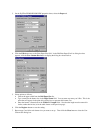
Setting the Banner Size in the Driver
Follow these steps to set up a banner size in the Plus3000/XL3000 printer driver. Keep in mind that you only need
to do this once for each banner size you want to use:
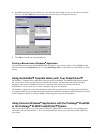
1. Click the Start button on the Windows taskbar, highlight Settings and select Printers.
2. Right click the FujiFilm PP3000/PP3000WIDE printer icon, and choose Properties from the menu that
appears.