


6
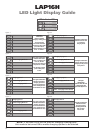
Undertaking Data Transfer Activities
To undertake data transfer activities with the LAP16H you will need to purchase the
following items…
• Fan Upgrade - Available as an optional upgrade. If ordered at the same time as the LAP16H cart then they
will be pre-fitted prior to delivery
• Network Lead Loom Kit - Available as an optional upgrade. The kit includes 2 x 8 network lead looms, all bound &
pre-cut to the required lengths for easy to install. If ordered at the same time as the LAP16H cart then this kit will be
pre-installed prior to delivery.
• Network Switch
• IEC to IEC power lead
DISCONNECT THE UNIT FROM THE ELECTRICAL SUPPLY!
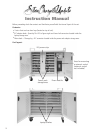
Step 1: Open the rear doors of the unit to access the 19” rack mounting brackets located on the right hand side of the
cabinet. Then attach the network switch to the mounting brackets. (Network switch not provided)
Step 2: Plug the IEC to IEC mains lead (Not provided) into the Timer Module on the cart and into the mains input on
the network switch.
Step 3: Connect a network cable into the network switch and then feed the other end out through the grommet hole
on the side of the cart into a LAN socket.
Step 4: Take the network lead looms and connect the equal length ends into the network switch. Connect the loom
labelled 1-8 into the left hand side of the switch and the loom labelled 9-16 into the right hand side of the switch*.
Step 5: Feed the other end of the network leads into the corresponding laptop shelves and connect into the laptops
Your LAP16H is now networked and ready for use with Data Transfer Activities.
*NOTE: If the Network Loom Kit is ordered at the time of initial purchase, then the 2 network lead looms will be
pre-fitted in the cabinet.
1
2
3
4
5
6
7
8
16
15
14
13
12
11
10
9
Network loom 9-16 Network loom 1-8