


7
Accessing LinkStation data is performed using the following steps:
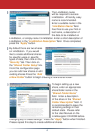
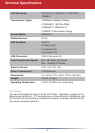
LinkStation’s ‘Root Directory’
will appear. You will see all
of the confi gured shares. All
users can read and write to all
folders. To setup security and
password protection, please
refer to the User Manual on the
LinkNavigator CD-ROM. Also,
please refer to the User Manual
to setup the print server. A
drive letter can also be mapped
for LinkStation, see the next step for more information. LinkStation can
be accessed by multiple computers simultaneously.
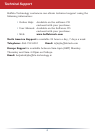
From the previous step’s ‘Root
Directory’ screen, use the pull
down menu and click ‘
Tools’
and then select ‘
Map Network
Drive
’. The ‘Map Network
Drive’ program will run. Select
the drive letter you would like
LinkStation to assume from the
‘Drive:’ pull down menu. Enter
the \\LinkStation_Name\share_
name in the ‘Folder:’ fi eld (where
LinkStation_Name is the ‘LinkStation Name’ and share_name is the
‘Shared Folder Name’ both set on Page 6). Once complete, check the
‘Reconnect at logon’ box and press the ‘
Finish’ button.
Congratulations, LinkStation is setup. Please see the User Manual on
the LinkNavigator CD-ROM for more help and confi guration options.
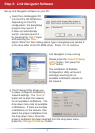
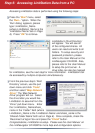
Press the ‘
Start’ menu, select
the ‘
Run...’ option. When the
‘Run’ dialog appears, please
type \\LinkStation_Name
(where LinkStation_Name is the
‘LinkStation Name’ set on Page
6). Press ‘
OK’ to continue.
Step 5: Accessing LinkStation Data from a PC