


2-2
Installation
2.2 INSTALLING THE 7C04 CHASSIS IN AN EQUIPMENT
RACK
The following section details the process of attaching mounting
brackets to the 7C04 Chassis, and installing the chassis in a
standard 19-inch equipment rack.
If you are not
installing the chassis in an equipment rack, skip to
Section 2.3.
2.2.1 Attaching Mounting Brackets
An accessory package containing two mounting brackets is
shipped with each 7C04 Chassis. The bracket that attaches to the
left side of the chassis contains the letters “BL” on the bottom front
of the bracket. The bracket that attaches to the right side of the
chassis contains the letters “BR” on the bottom front of the bracket.
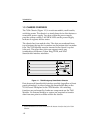
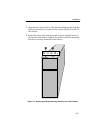
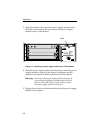
To attach mounting brackets to the chassis, use the following steps
and refer to Figure 2-1:
1. Stand the chassis on its left side with the front of the chassis
facing you.
2. Use a phillips-head screwdriver to remove the two screws
closest to the front of the chassis. Set the screws aside.
3. Align the two round holes of the right mounting bracket with
the holes (from which you removed the screws) on the right
side of the chassis.
4. Insert the screws that you removed in step 2 into the holes on
the bracket and chassis. Tighten the screws until the mounting
bracket is securely attached to the chassis.
5. Stand the chassis on its right side with the front facing you.
6. Use a phillips-head screwdriver to remove the two screws
closest to the front of the chassis. Set the screws aside.