


A B
A
B
33
Windows 7
Windows Vista
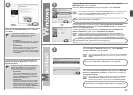
Conguración inalámbrica mediante WCN (Windows Connect Now)
Lea esta sección sólo si congura una conexión inalámbrica mediante la función WCN (Windows Connect Now) de Windows 7/Windows Vista.
Canon no asume ninguna responsabilidad en el caso de que se pierdan o dañen los datos almacenados en la
unidad ash USB, con independencia del motivo, incluso dentro del periodo de garantía.
No se garantiza el funcionamiento dependiendo de la unidad ash USB utilizada. No se pueden utilizar
unidades USB ash con la función de seguridad ya habilitada.
•
•
El equipo es compatible con “WCN-UFD”.
1. Haga clic en Iniciar (Start) > Panel de control (Control Panel) > Ver el estado y las tareas de red
(View network status and tasks) > Administrar redes inalámbricas (Manage wireless networks).
2. Seleccione el nombre de red (SSID) y haga clic en ella con el botón secundario; a continuación,
seleccione Propiedades (Properties).
3. Seleccione
Copiar este perl de red en una unidad ash USB (Copy this network prole
to a USB ash drive)
.
Siga las instrucciones en pantalla para finalizar la configuración en el ordenador.
4. Vaya a
.
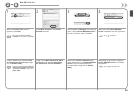
Conguración en el ordenador Conguración en el equipo
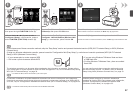
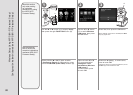
1. Desde el menú Iniciar (Start) de Windows, seleccione Red (Network); a continuación, haga clic en
Agregar un dispositivo inalámbrico (Add a wireless device) en el menú.
2. Haga clic en
Deseo agregar un dispositivo inalámbrico o equipo que no está en la lista
mediante el uso de una unidad ash USB (I want to add a wireless device or computer that is
not on the list, using a USB ash drive).
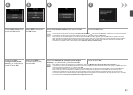
3. Haga clic en
Agregar el dispositivo o equipo usando una unidad ash USB (Add the device or
computer using a USB ash drive).
4. Seleccione el nombre de la red (SSID) y haga clic en
Siguiente (Next).
Siga las instrucciones en pantalla para finalizar la configuración en el ordenador.
5. Vaya a
.
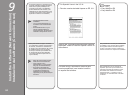
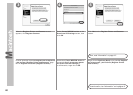
A continuación, lea “9 Instalación del software
(Conexión de red)” en la página 34.
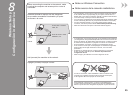
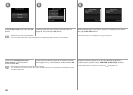
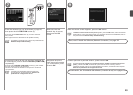
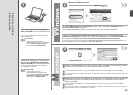
1. Seleccione Congurac. LAN inalámbrica (Wireless
LAN setup) en Menú Congurar (Setup menu) de
la pantalla LCD (A); a continuación, pulse el botón OK.
2. Seleccione
Otra conguración (Other setup);
a continuación, pulse el botón
OK.
3. Seleccione
WCN; a continuación, pulse el botón OK.
4. Conecte la unidad ash USB al puerto de impresión
directa (conector USB) (B) que se encuentra en la
parte delantera derecha del equipo y, a continuación,
pulse el botón OK.
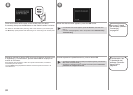
5. Cuando aparezca la pantalla
Conguración LAN
inalámbrica completa. (Wireless LAN settings
completed.), pulse el botón OK y expulse la unidad
ash USB.
Read this section only when setting up a wireless connection by using the WCN (Windows Connect Now) function of Windows 7/Windows Vista.
Canon assumes no responsibility for any damage or loss of data stored on your USB ash drive regardless of
the cause even within the warranty period.
Operation may not be guaranteed depending on your USB ash drive. USB ash drives with security enabled
may not be used.
•
•
Wireless Setup Using WCN (Windows Connect Now)
The machine supports “WCN-UFD”.
1. Click Start > Control Panel > View network status and tasks > Manage wireless networks.
2. Select the network name (SSID) and right-click it, then select
Properties.
3. Select
Copy this network prole to a USB ash drive.
Follow the on-screen instructions to complete the settings on the computer.
4. Go to
.
Setup on the Computer Setup on the Machine
1. From the Start menu of the Windows side, select Network, then click Add a wireless device on
the menu.
2.
Click I want to add a wireless device or computer that is not on the list, using a USB ash drive.
3. Click Add the device or computer using a USB ash drive.
4. Select the network name (SSID), then click
Next.
Follow the on-screen instructions to complete the settings on the computer.
5. Go to
.
1. Select
Wireless LAN setup of the Setup menu
screen on the LCD (A), then press the OK button.
2. Select
Other setup, then press the OK button.
3. Select
WCN, then press the OK button.
4. Connect the USB ash drive to the Direct Print Port
(USB connector) (B) on the front right of the machine,
then press the OK button.
5. When
Wireless LAN settings completed. screen
is displayed, press the OK button and eject the USB
ash drive.
Next, read “9 Install the Software
(Network Connection)” on page 34!