


2
1
2
1
3
6
1
2
5
2
4
7
8
1
2
3
2
1
Black: PG-240XXL 5204B001
Color: CL-241XL 5208B001
Black: PG-240XL 5206B001
Color: CL-241 5209B001
Black: PG-240 5207B001
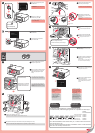
Inserte el cartucho FINE (FINE
Cartridge) hasta que se detenga.
¡No lo golpee contra los lados!
44
Si aparece un mensaje
de error, compruebe que
el cartucho FINE (FINE
Cartridge) está instalado
correctamente.
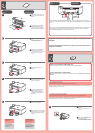
Cierre la tapa de salida del papel
(Paper Output Cover).
Espere aproximadamente 1 o 2 minutos
hasta que desaparezca la pantalla 2 y
continúe.
66
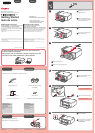
Tenga cuidado con la tinta de la cinta
protectora.
Desembale el cartucho FINE
(FINE Cartridge) y retire la cinta
protectora.
33
Asegúrese de que la cubierta
del cabezal (Head Cover) se
ha abierto automáticamente.
Si la cubierta del cabezal (Head Cover)
está cerrada, cierre la tapa de salida
del papel (Paper Output Cover) y repita
el paso 1.
Abra la bandeja de salida del papel
(Paper Output Tray) y la tapa de
salida del papel (Paper Output
Cover).
11
Baje la palanca de bloqueo del cartucho de tinta (Ink Cartridge Lock Lever).
22
Instale el cartucho FINE (FINE Cartridge) de color a la izquierda y el negro a la derecha.
Insértelo recto hasta que se detenga.
Levante la palanca de bloqueo del
cartucho de tinta (Ink Cartridge
Lock Lever).
Repita los pasos 2 a 5 para instalar el
otro cartucho FINE (FINE Cartridge).
55
¡No tocar!
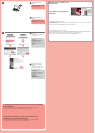
Cuando el equipo no se
utiliza durante unos 5
minutos, la pantalla LCD
se desconecta. Para
reactivarla, pulse cualquier
botón en el panel de
control (Operation Panel).
Cuando aparezca la pantalla 1,
pulse el botón OK.
88
Seleccione su idioma y, a
continuación, pulse OK.
77
Para cambiar el ajuste de idioma, pulse
el botón Atrás (Back).
Botón Atrás (Back)
Los cartuchos FINE (FINE Cartridges) siguientes son compatibles con este equipo.
Llame al 1-800-OK-CANON para localizar un distribuidor cercano o visite la tienda en
línea Canon en www.shop.usa.canon.com
N.º de referencia
Información
de pedidos
Insert the FINE Cartridge until it
stops.
Do not knock it against the sides!
44
If an error message
appears, check that the
FINE Cartridge is installed
correctly.
Close the Paper Output Cover.
Wait for about 1 to 2 minutes until screen
2 disappears, then proceed.
66
Be careful of ink on the protective tape.
Unpack the FINE Cartridge, then
remove the protective tape.
33
Check that the Head Cover has
opened automatically.
If the Head Cover is closed, close the
Paper Output Cover, then redo step 1.
Open the Paper Output Tray and
the Paper Output Cover.
11
Lower the Ink Cartridge Lock Lever.
22
Install the Color FINE Cartridge to the left and Black to the right.
Insert it straight until it stops.
Lift the Ink Cartridge Lock Lever.
Repeat step 2 to 5 to install the other
FINE Cartridge.
55
Do not touch!
The LCD turns off if the
machine is not operated
for about 5 minutes.
To restore the display,
press any button on the
Operation Panel.
When screen 1 is displayed, press
the OK button.
88
Select your language, then press
the OK button.
77
To change the language setting, press
the Back button.
Back button
The following FINE Cartridges are compatible with this machine.
Call 1-800-OK-CANON to locate a dealer near you, or visit the Canon online store at
www.shop.usa.canon.com
Order #
Ordering
Information