


USER’S GUIDE 2619
5
Daylight Saving Time (DST)
Daylight Saving Time (summer time) advances the time setting by one hour from
Standard Time. Remember that not all countries or even local areas use Daylight
Saving Time.
The time calibration signal transmitted from Fort Collins, Colorado includes both
Standard Time and DST data. When the auto DST setting is turned on, the watch
switches between Standard Time and DST (summer time) automatically in
accordance with the Fort Collins signal.
• The time calibration signals transmitted from the Fukushima and Fukuoka/Saga do
not include summer time data.
• The auto DST setting can be turned on only while
HNL, ANC, LAX, DEN,
CHI, NYC, TYO, SEL, or HKG is selected as the Home City code.
• If you experience problems receiving the time calibration signal in your area, it is
probably best to switch between Standard Time and Daylight Saving Time (summer
time) manually.
4.Press A to exit the setting screen.
• The DST indicator appears on the display to indicate
that Daylight Saving Time is turned on.
To change the Daylight Saving Time (summer time) setting
1.In the Timekeeping Mode, hold down A until the
seconds start to flash, which indicates the setting
screen.
2.Press C to display the DST setting screen.
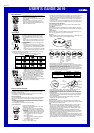
3.Press D to cycle through the DST settings in the
sequence shown below.
Auto DST
(
AUTO
)
DST Off
(
OFF
)
DST On
(
ON
)
Reference
This section contains more detailed and technical information about watch operation.
It also contains important precautions and notes about the various features and
functions of this watch.
Auto Display
Auto Display continually changes the contents of the
digital display.
To turn off Auto Display
Press any button to turn off Auto Display.
To turn on Auto Display
While the Mode Menu screen is on the display, press A
and C at the same time.
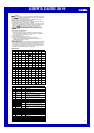
Inputting Text
The following describes how to input text in the Recall Mode, e-DATA MEMORY and
Alarm Modes.
To input characters
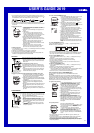
1.When the cursor is on the display, press D to cycle
through the available letters, numbers and symbols, in
the sequence shown below.
2.When the character you want is at the cursor position,
press C to move the cursor to the right.
3. Repeat steps 1 and 2 to input the rest of the characters you want.
• See the “Character List” for information about the characters you can input.
Cursor
Recall Mode
(space)
to )
(symbol)
0
to
9
(number)
a to z
(lower-case)
A
to
Z
(upper-case)
Auto Return Features
• If you leave the watch without performing any operation in the Signal Receive,
Recall, e-DATA MEMORY, or Alarm Mode for two or three minutes, it automatically
changes to the Mode Menu screen.
• If you leave a screen with flashing digits or a cursor on the display for two or three
minutes without performing any operation, the watch automatically exits the setting
screen.
Scrolling
The B and D buttons are used in various modes and setting screens to scroll
through data on the display. In most cases, holding down these buttons during a scroll
operation scrolls through the data at high speed.
Initial Screens
When you enter the e-DATA MEMORY, World Time, or Alarm Mode, the data you were
viewing when you last exited the mode appears first.
Time Calibration Signal Reception Precautions
• Signal reception is terminated if any alarm starts to sound while reception is being
performed.
• Strong electrostatic charge can result in the wrong time being set.
• Even when the watch is within the reception range of the transmitter, signal
reception is impossible if the signal is blocked by mountains or other geological
formations between the watch and signal source.
• Signal reception is affected by weather, atmospheric conditions, and seasonal
changes.
• The time calibration signal is bounced off the ionosphere. Because of this, such
factors as changes in the reflectivity of the ionosphere, as well as movement of the
ionosphere to higher altitudes due to seasonal atmospheric changes or the time of
day may change the reception range of the signal and make reception temporarily
impossible.
• Even if the time calibration signal is received properly, certain conditions can cause
the time setting to be off by up to one second.
• The current time setting in accordance with the time calibration signal takes priority
over any time settings you make.
• The watch is designed to automatically update the date and day of the week for the
period January 1, 2000 to December 31, 2099. Setting of the date by the time
calibration signal cannot be performed starting from January 1, 2100.
• This watch can receive signals that differentiate between leap years and non-leap
years.
• Though this watch is designed to receive both time data (hour, minutes, seconds)
and date data (year, month, day), certain signal conditions can limit reception to time
data only.
• When all three auto receptions are successful (2:00 AM, 4:00 AM, and 5:00 AM), the
watch uses the data of the last reception for calibration. When only one reception is
successful, the watch uses the data of the successful reception.
• Normally, the signal reception date shown by the Last Signal screen is date data that
is included in the received time calibration signal. When only time data is received,
however, the Last Signal screen shows date as kept in the Timekeeping Mode at the
time of signal reception.
• If you are in an area where proper time calibration signal reception is impossible, the
watch keeps time within ±15 seconds a month at normal temperature.
Japan Signal Frequencies
When you have
TYO
(Tokyo) selected as the Home City code, you can use the
following procedure to specify either 40kHz or 60kHz as the reception frequency. The
frequency you should use depends on your current location in Japan. See the map
under “Important!” for more information.
Setting
City code
DST (summer time)
Auto receive
Initial Factory Default
NYC (New York)
AUTO(Auto switching)
On (Auto receive)
• If you have problems with proper time calibration signal reception or if the time
setting is wrong after signal reception, check your current city code and DST
(summer time) settings, and auto receive setting. The following are the initial factory
defaults for these settings.
To select a frequency for use in Japan
1.Enter the Signal Receive Mode.
2.Hold down A until
FREQ.
appears, with the receiving
indicator (Level 4) flashing. This is the setting screen.
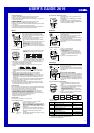
3.Use D to select the frequency you want to use.
• Each press of D cycles through the available
frequencies as described below.
40:60
: The watch automatically selects the
frequency that has the strongest signal.
40
: Receives the signal from Fukushima (40kHz).
60
: Receives the signal from Fukuoka/Saga
(60kHz).
4.Press A to exit the setting screen.
• Reception can take up to 12 minutes when the
40:60
option is selected.
Frequency
Timekeeping
• Resetting the seconds to 00 while the current count is in the range of 30 to 59
causes the minutes to be increased by 1. In the range of 00 to 29, the seconds are
reset to
00 without changing the minutes.
• The day of the week is automatically displayed in accordance with the date (year,
month, and day) settings.
• The year can be set in the range of 2000 to 2099.
• The watch’s built-in full automatic calendar makes allowances for different month
lengths and leap years. Once you set the date, there should be no reason to change
it except after you have the watch’s battery replaced.
• The current time for all city codes in the Timekeeping Mode and World Time Mode is
calculated in accordance with the Greenwich Mean Time (GMT) differential for each
city, based on your Home City time setting.
• GMT differential is calculated by this watch based on Universal Time Coordinated
(UTC*) data.
* The letters “UTC” stands for “Universal Time Coordinated,” which is the world-wide
scientific standard of timekeeping. It is based upon carefully maintained atomic
(cesium) clocks that keep time accurately to within microseconds. Leap seconds
are added or subtracted as necessary to keep UTC in sync with the Earth’s
rotation. The reference point for UTC is Greenwich, England.
12-hour/24-hour Timekeeping Formats
The 12-hour/24-hour timekeeping format you select in the Timekeeping Mode is
applied in all modes.
• With the 12-hour format, the P (PM) indicator appears on the display for times in the
range of noon to 11:59 p.m. and the A (AM) indicator appears for times in the range
of midnight to 11:59 a.m.
• With the 24-hour format, times are displayed in the range of 0:00 to 23:59, without
any indicator.
Backlight Precautions
The backlight uses an EL (electro-luminescent) panel that causes the entire display to
glow for easy reading in the dark. In any mode, press L to illuminate the display for
about one second.
• The electro-luminescent panel that provides illumination loses power after very long
use.
• The illumination provided by the backlight may be hard to see when viewed under
direct sunlight.
• The watch may emit an audible sound whenever the display is illuminated. This is
due to vibration of the EL panel used for illumination, and does not indicate
malfunction.
• The backlight automatically turns off whenever an alarm sounds.
• Frequent use of the backlight shortens the life of the battery.
Battery
The indicator BATT flashes on the display any time
battery power is below a certain level. Low battery power
can cause the following conditions to occur.
• Dim, difficult-to-read display characters
• Failure of the backlight and beeper tone operations
• Inability to perform time calibration signal reception
• Inability to create a time memo, or to perform Recall
Mode, and e-DATA MEMORY Mode operations
l
l
l
l
l
l
l
l
l
l
l
l
l
l
l
l
l
l
l
l
l
If battery power goes low while you are inputting Time Memo, e-DATA MEMORY, or
alarm text data, the data you are inputting may not be saved in memory. Normal watch
operation will return after the BATT indicator disappears. If it does not disappear, have
the battery replaced.
Always leave battery replacement up to the dealer where you bought the watch or
to an authorized CASIO distributor. Be sure to show the “Attention dealer or CASIO
distributor” information to the person replacing the battery.