E-10
To delete characters using the DEL key
Example: To change the word “commmputer” to “computer”.
1. Use H and J to move the cursor under the first (far left) “m”.
2. Press DEL twice to delete the two m’s at the cursor’s position, shifting “mputer”
to the left as you do.
3. Press FUNC and then J to jump back to the end of the characters for more
input.
Clearing the Display
Use the following procedure to clear all input text from the display.
To clear the display
Press FUNC and then DEL (CLS).
At this time the message CLS? appears on the display to confirm that you want
to clear the display. Press SET to clear or ESC to abort the operation without
clearing anything.
Text Editing
You can use the following procedures to edit text on the display.
To insert new characters
Example: To change the text “ABCDEF” to “ABCXYZDEF”.
1. With the original text on the display, move the cursor under the letter “D”.
2. Input the new characters (XYZ).
• Inputting the new characters causes them to be inserted at the cursor posi-
tion. The existing characters are opened up to make room for the new char-
acters.
To change existing characters to different ones
Example: To change the text “ABCDEF” to “XYZDEF”.
1. With the original text on the display, use either the BS key or DEL key to
delete the characters to be changed (ABC).
• Remember to use the correct cursor location for the key you plan to use to
delete the characters. See page E-9 for details.
2. Input the new characters (XYZ).
Part 5 Character Size and Text Effects
This part of the manual explains how to change the size of characters. It also
tells you how to assign text effects like underlining, shading, and box printing.
Character Size
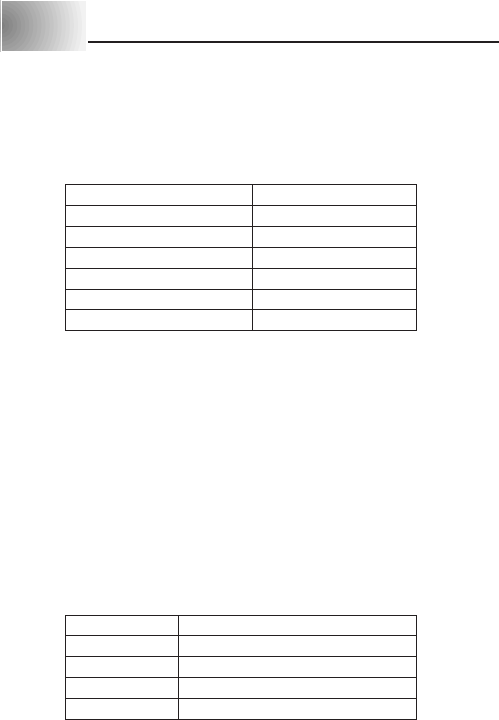
The following table shows the six character sizes that are available.
*These sizes are not supported when using 6mm tape.
They are automatically converted as shown below.
2 × 1 → 1 × 1
2 × 2 → 1 × 2
2 × 3 → 1 × 3
Character size changes are applied to printed text only. The size of the dis-
played text does not change.
Important!
• Any character size specification you make is applied to all the characters on
the display. You cannot make multiple specifications for specific characters.
• The Label Printer automatically adjusts the character size whenever you in-
put a B symbol to create a 2-line label as shown below.
Deleting the B symbol with a backspace or delete operation reverts to the
initial (unadjusted) character size.
Character Size Indicator Actual Size (mm)
1×1 2.5×2.5
1×2 2.5×5
1×3 2.5×7.5
2×1* 5×2.5
2×2* 5×5
2×3* 5×7.5
Initial Size Size After
BB
BB
B Operation
AUTO 1×1
2×11×1
2×21×2
2×31×3


