


Chapter 2. Installing DAStape
12
Connecting the DAStape
Follow these instructions to connect the DAStape unit.
1. Plug in the power cord.
2. Turn on the DAStape unit.
Note: The DAStape will make a high-pitched noise upon start up. This is
normal behavior for the low-voltage sensor in the unit.
Note: The DAStape has a SCSI terminator built into the unit. It can
therefore only be placed at the end of a SCSI bus.
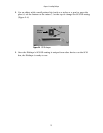
Configuring the DAStape
The DAStape comes with a SCSI ID switch that can be set for an ID between 0 and 15.
You will need to make sure that the SCSI ID on the DAStape does not conflict with any
other devices on the SCSI bus. To change the SCSI ID setting, follow these steps:
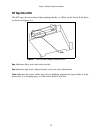
1. Locate the SCSI ID on the rear panel of the DAStape, just above the terminator
ports. The current ID setting is shown in the indicator window (Figure 2-4).