


Page 3 of 3
8. Before raising projector to ceiling, make sure all fasteners are securely tightened to the
projector and the adapter plate.
9. Raise unit to ceiling as follows:
A Depress and hold the arrow side of rocker/control switch [Figure 1, Item (5)] until
the adapter plate is seated to the ceiling mount housing.
B When adapter plate is properly seated, the unit will turn off.
C After the adapter plate is seated to ceiling housing, make sure hasps connect
with keeper plates and lock the four locking hasps.
D Turn clockwise to lock adapter plate to ceiling mount housing and turn the power
switch (4) to OFF. You can now attach power and cables to the projector.
See projector alignment sheet for projector alignment.
10. To lower projector for servicing, disconnect all power cables and signal cables from the
projector. Repeat step 5 to lower.
AGNA-LIFT ELECTRIC CEILING MOUNT EVCM-100D
Projector Alignment Instructions
WARNING! During projection alignment, loosen mounting hardware only
enough to allow for necessary movement. Loosening or removal of mounting
hardware may result in serious damage to equipment or personal injury.
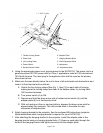
Vertical Elevation (pitch): Adjust pitch by loosening six-pitch adjustment bolts (See Figure
1,Item 8). Loosen both sides and adjust pitch by tilting projector in the desired direction. When
desired pitch is obtained, securely tighten bolts on both sides.
Horizontal Tilt (roll): Adjusted roll by loosening six-pitch adjustment bolts (8) and turning
adjustment bolt (9) clockwise to raise and counter clockwise to lower. Roll adjustment can be
done on both sides of unit. When desired roll is obtained, securely tighten the six-pitch
adjustment bolts.
Positive Registration Lock: Tighten pitch adjustment bolts. You can now lower the unit to the
ground and remove the projector, without losing projector registration, by removing six bolts (7)
holding the HB hanging bracket to the EVCM.
Horizontal Adjustments: Loosen, but do not remove, nuts holding the top slide bracket (10).
When nuts are loose, adjust unit 1 1/2" in any direction.