


64
Maintenance and Filter Cleaning
Turn off the projector, and unplug the AC power cord
from the AC outlet.
First, clean up the dust on the projector and around the
air vents.
1
2
Filter prevents dust from accumulating on the optical elements inside the projector. Should the filter becomes
clogged with dust particles, it will reduce cooling fans’ effectiveness and may result in internal heat buildup and
adversely affect the life of the projector. If a “Filter warning” icon (yellow or red) appears on the screen and the
WARNING FILTER indicator lights or blinks, clean the filter immediately. Clean the filter by following the steps
below.
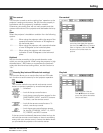
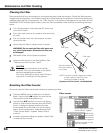
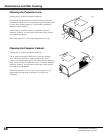
Pull out the filter cover from the projector and then
remove the filter.
3
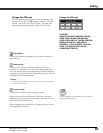
Reinstall the filter into the projector properly.
5
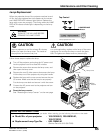
CAUTION
Do not operate the projector with the filter
removed. Dust may accumulate on the optical
elements degrading picture quality.
Do not put anything into the air vents. Doing so
may result in malfunction of the projector.
Gently clean the filter by using a brush or blower.
WARNING: Do not wash the filter with water and
any other liquid matter. Otherwise the filter may
be damaged.
4
Reset the filter counter in the Setting Menu. See
“Resetting the Filter Counter” below.
6
Press and hold the
filter cover and pull
out the filter.
Filter cover
Filter
Filter
Filter cover
Be sure to reset the Filter counter after cleaning or replacing the filter.
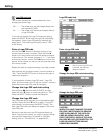
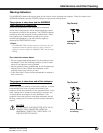
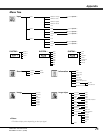
Press the MENU button to display the On-Screen
Menu. Use the Point 7 8 buttons to move the red
frame pointer to the Setting Menu icon.
Use the Point ed buttons to move the red frame
pointer to Filter counter and then press the SELECT
button. A dialog box appears showing the total
accumulated time of the filter use, a timer setting
option, and the reset option. Select Reset and the
“Filter counter Reset?” appears. Select [Yes] to
continue.
1
2
Resetting the Filter Counter
Filter counter
NOTE: If the filter is heavily clogged and unable
to clean, replace it with a new one.
Consult your dealer for details.
Replacement Filter Part No.: 10-A9103307184
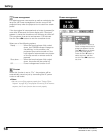
Select Reset and the “Filter
counter Reset?” appears.
Select [Yes],
then another
confirmation
box appears.
Select [Yes] again to reset
the Filter counter.
Another confirmation dialog box appears, select [Yes]
to reset the Filter counter.
3
Cleaning the Filter
LX380-380L-450 User Manual
020-000061-01 Rev. 1 (07/08)