


5-4
Cisco Nexus 2000 Series Hardware Installation Guide
Chapter 5 Connecting a Cisco Nexus Fabric Extender
Connecting to a 10-Gigabit and 40-Gigabit Ethernet Port
• If the transceiver has a bale clasp latch, open the clasp by pressing it downward, and then pull the
transceiver out of the port.
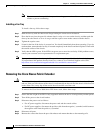
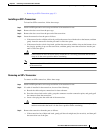
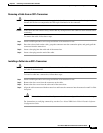
Note If you have difficulty removing a bale clasp SFP+ transceiver, you should reseat it by returning
the bale clasp to the up position. Press the SFP+ transceiver inward and upward into the cage.
Next, lower the bale clasp and pull the SFP+ transceiver straight out with a slight upward lifting
force (see Figure 5-1). Be careful not to damage the port cage during this process.
Figure 5-1 Alternate Removal Method for Bale Clasp SFP+ Transceivers
Step 4
Insert a dust cover into the port end of the transceiver and place the transceiver on an antistatic mat or
into a static shielding bag if you plan to return it to the factory.
Step 5 If another transceiver is not being installed, protect the optical cage by inserting a clean cover.
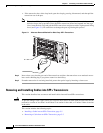
Removing and Installing Cables into SFP+ Transceivers
This section describes how to remove and install cables into and from SFP+ transceivers.
Caution To prevent damage to the copper cables, do not place more tension on them than the rated limit and do
not bend to a radius of less than 1 inch if there is no tension in the cable, or 2 inches if there is tension
in the cable.
This section includes the following topics:
• Installing a Cable into an SFP+ Transceiver, page 5-5
• Removing a Cable from an SFP+ Transceiver, page 5-5
186903