


18-8
Cisco ASA Series Firewall CLI Configuration Guide
Chapter 18 Configuring Cisco Mobility Advantage
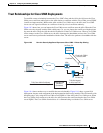
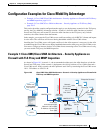
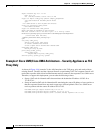
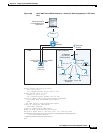
Configuring Cisco Mobility Advantage
What to Do Next
Once you have created the trustpoints and installed the Cisco UMA certificate on the ASA, create the
TLS proxy instance. See Creating the TLS Proxy Instance, page 18-8.
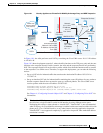
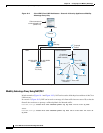
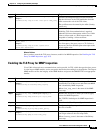
Creating the TLS Proxy Instance
Create a TLS proxy instance for the Cisco UMA clients connecting to the Cisco UMA server.
Prerequisites
Before you can create the TLS proxy instance, you must have installed the Cisco UMA server self-signed
certificate in the ASA truststore.
Command Purpose
Step 1
hostname(config)# crypto ca trustpoint
trustpoint_name
Example:
hostname(config)# crypto ca trustpoint cuma_server
Enters the trustpoint configuration mode for the
specified trustpoint so that you can create the
trustpoint for the Cisco UMA server.
A trustpoint represents a CA identity and possibly a
device identity, based on a certificate issued by the
CA.
Step 2
hostname(config-ca-trustpoint)# enrollment terminal
Specifies cut and paste enrollment with this
trustpoint (also known as manual enrollment).
Step 3
hostname(config-ca-trustpoint)# exit
Exits from the CA Trustpoint configuration mode.
Step 4
hostname(config)# crypto ca authenticate trustpoint
Example:
hostname(config)# crypto ca authenticate cuma_server
Enter the base 64 encoded CA certificate.
End with a blank line or the word "quit" on a line
by itself
[ certificate data omitted ]
Certificate has the following attributes:
Fingerprint: 21B598D5 4A81F3E5 0B24D12E 3F89C2E4
% Do you accept this certificate? [yes/no]: yes
Trustpoint CA certificate accepted.
% Certificate successfully imported
hostname(config)#
Installs and authenticates the CA certificates
associated with a trustpoint created for the Cisco
UMA server.
Where trustpoint specifies the trustpoint from which
to obtain the CA certificate. Maximum name length
is 128 characters.
The ASA prompts you to paste the base-64
formatted CA certificate onto the terminal.
Command Purpose
Step 1
hostname(config)# tls-proxy proxy_name
Example:
tls-proxy cuma_tlsproxy
Creates the TLS proxy instance.
Step 2
hostname(config-tlsp)# server trust-point proxy_name
Example:
hostname(config-tlsp)# server trust-point cuma_proxy
Specifies the proxy trustpoint certificate presented
during TLS handshake.
The certificate must be owned by the ASA (identity
certificate).