


Cisco 7000 and Cisco 7507 Rack-Mount Kit Installation Instructions 23
Installation
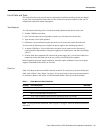
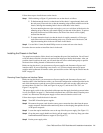
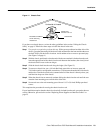
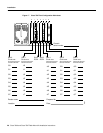
Figure 14 Chassis Foot
If you have not already done so, review the safety guidelines in the section “Lifting the Chassis
Safely” on page 8. Then follow these steps to install the chassis in the rack:
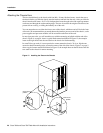
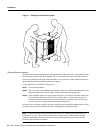
Step 1 Two people are required to perform this step. With a person positioned at either side of the
chassis, grasp the bottom edge of the chassis with one hand near the front and the other near
the back. Slowly lift the chassis in unison. Avoid sudden twists or moves to prevent injury.
(See Figure 5 on page 9.)
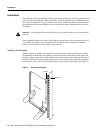
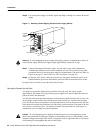
Step 2 With the chassis positioned so that the end with the ears attached is farthest from the rack,
insert the opposite end of the chassis into the rack between the brackets, then slowly lower
the chassis until it rests on the two ledges.
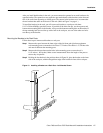
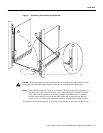
Step 3 Slide the chassis back into the rack along the ledges. (See Figure 15.)
Step 4 To remove a chassis foot, use a 1/4-inch flat-blade screwdriver or insert an open-end
7/16-inch wrench (or an adjustable wrench set at 7/16) between the underside of the chassis
and the foot. Turn the foot clockwise (counterclockwise if the chassis is directly above you)
until the foot drops out of the chassis.
Step 5 When the chassis feet are removed, continue sliding the chassis into the rack until the ears
meet the front mounting posts on both sides of the rack.
Step 6 Secure each ear to the rack-mounting post with two 10-32 x 5/8-inch, Phillips pan-head
screws.
This completes the procedure for moving the chassis into the rack.
If your installation requires that the chassis be electrically isolated from the rack, proceed to the next
section. Otherwise, proceed to the section “Replacing Power Supplies and Interface Cables” on
page 25.
Underside of chassis
Chassis foot
Chassis foot
removal 7/16" nut
Flat-blade screwdriver
slot for removing
chassis foot
H1396a