


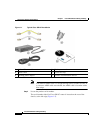


1-7
Cisco SB 107 Router Cabling and Setup
78-16774-01
Chapter 1 Cisco SB 107 Router Cabling and Setup
Try to Connect to a Website
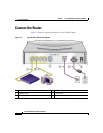
Follow these steps to connect the router to the power supply, your local network,
and your service provider’s network:
Step 1 If you are connecting more than four PCs to the router, connect the router to a
switch or hub using a yellow Ethernet cable, as shown in Figure 1-3.
Step 2 To connect a PC directly to your router, do so as shown in Figure 1-3. Turn the PC
off so that it will obtain an IP address from the router when it is turned on. You
can connect additional PCs to the remaining numbered Ethernet ports.
Step 3 The console port is a service port to which you can connect a terminal or PC in
order to configure the software by using the command-line interface (CLI) or to
troubleshoot problems with the router. If you want access to the router console,
connect a PC or terminal to the console port on the router.
Note By connecting the console port to an asynchronous modem using the
optional modem cable, you can add dial backup and remote management
capabilities to the router.
Step 4 Connect the ADSL port on the router to the telephone wall jack using the lavender
ADSL cable. If the ADSL line is also used for voice communication, you can
prevent disruption to data communication by connecting the router to an ADSL
splitter, or by installing microfilters between telephones or fax equipment and the
wall jack.
Step 5 Connect power to the router as shown in Figure 1-3 and turn on the router. Be sure
to use the power supply that was shipped with the router. Other Cisco power
supplies will not connect to the router.
Try to Connect to a Website
Log in to a PC that is connected to the router, open a web browser, and connect to
a website. If you successfully access a website, you do not need to change the
configuration and you have completed setup. If you cannot access a website,
follow the steps in the “Configure the Router” section on page 1-8.