


2-4
Cisco 827 and SOHO 77 Routers Hardware Installation Guide
78-6854-03
Chapter 2 Installation
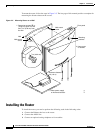
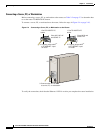
Preventing Router Damage
To prepare for installation, follow these steps:
Step 1 Obtain the ADSL line.
Step 2 Remove the yellow Ethernet cable, light blue console cable, lavender ADSL cable, product
documentation, and Cisco 800 Documentation CD-ROM from the Open Me First bag. Remove the
desktop power supply and the black power cord from the accessory kit. Gather the Ethernet devices to
be connected to the router: hub, server, workstation, or PC.
Step 3 If you plan to connect an analog telephone or fax machine, gather these devices. You must also provide
the telephone cable to connect each device (this cable is usually provided with the device).
Step 4 If you plan to configure the software using a terminal or PC connected to the router, provide the terminal
or PC.
Step 5 If you plan to use the cable lock feature available on the Cisco 827, SOHO 77, and Cisco 827-4V routers,
you must provide a Kensington or equivalent locking cable.
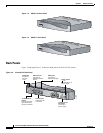
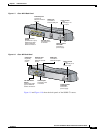
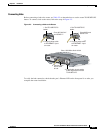
Preventing Router Damage
Follow these guidelines when connecting devices to your router:
• Connect the color-coded cables supplied by Cisco Systems to the color-coded ports on the back
panel.
• If you must supply your own cable, see Appendix A, “Specifications and Cables,” for cabling
specifications. If this appendix does not provide specifications for a particular cable, we strongly
recommend ordering the cable from Cisco Systems.
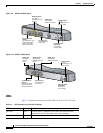
• If the symbol of suitability ( ) appears above a port, you can connect the port directly to a public
network that follows the European Union standards.
Warning
If the symbol of suitability with an overlaid cross ( ) appears above a port, you must not connect the
port to a public network that follows the European Union standards. Connecting the port to this type
of public network can cause severe injury or damage to your router.