


5-2
Cisco VG350 Voice Gateway Hardware Installation Guide
OL-25970-01
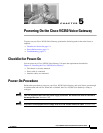
Chapter 5 Powering On the Cisco VG350 Voice Gateway
Power-On Procedure
To power on the Cisco VG350 Voice Gateway, perform the following:
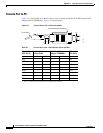
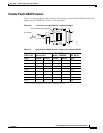
Step 1 Power on your terminal or PC, and configure it for 9600 bps, 8 data bits, 1 stop bit, and no parity.
Step 2 Move the Cisco VG350 Voice Gateway power switch to the ON position.
The green LED next to the auxiliary port should come on and the fan should operate. If this does not
happen, see the “Troubleshooting” section on page 5-3.
The following message is displayed at the end of the boot-up messages:
--- System Configuration Dialog ---
Would you like to enter the initial configuration dialog? [yes/no]:
Step 3 Enter no to proceed with manual configuration using the CLI:
Would you like to enter the initial configuration dialog? [yes/no]: no
Would you like to terminate autoinstall? [yes]
Step 4 Press Return to terminate autoinstall and continue with manual configuration.
Several messages are displayed, ending with a line similar to the following:
...
Copyright (c) 1986-2003 by cisco Systems, Inc.
Compiled <date> <time> by <person>
Step 5 Press Return to bring up the Router> prompt:
...
flashfs[4]: Initialization complete.
Router>
Step 6 Enter privileged EXEC mode:
Router> enable
Router#
Step 7 Continue with the “Troubleshooting” section on page 5-3.
Note If the rommon 1> prompt appears, your system has booted in ROM monitor mode. For information on the
ROM monitor, refer to the router rebooting and ROM monitor information in the Cisco IOS
Configuration Fundamentals Configuration Guide for your Cisco IOS software release.