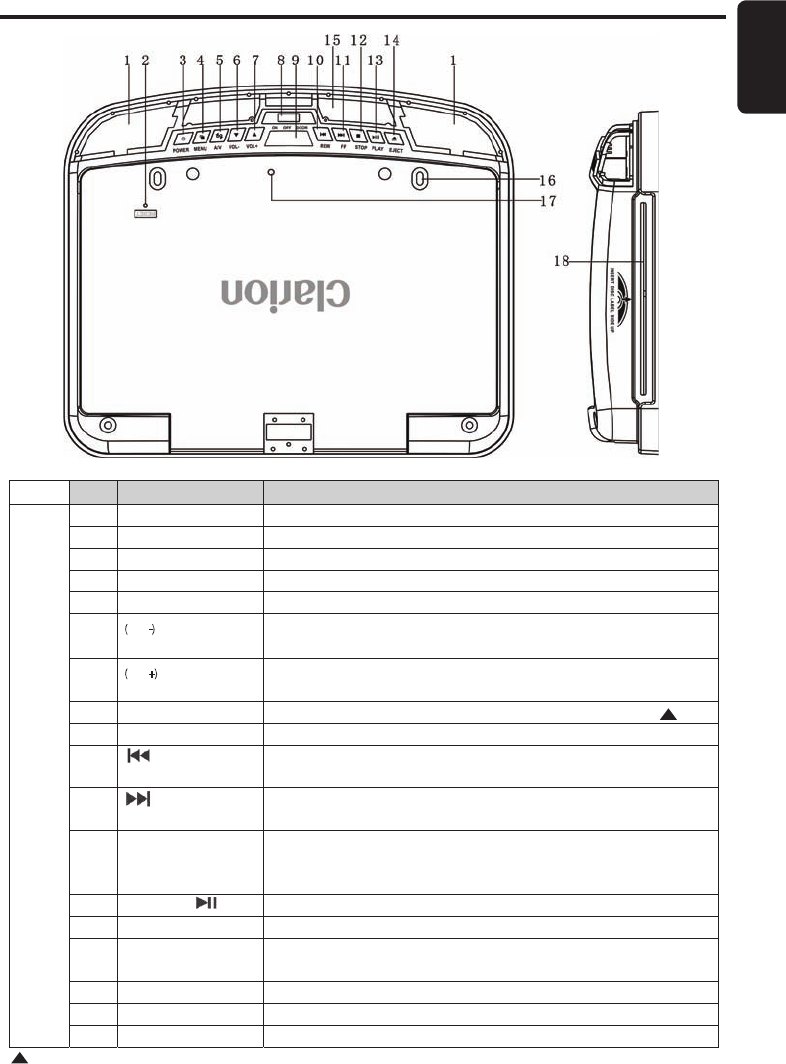
Item Name Function or Control
1 Dome Light Provides an interior light for the vehicle.
2 Reset Button Press with a pencil or other narrow-tipped tool to rest the player.
3 Power Button Press to turn on or turn off the player
4 Menu Button Press to open the Display menu. Press again to sequentially select each menu item.
5 AV Input Source Button Press to select the desired Video Input Mode. (DVD-IN, AV IN1 and AV IN2).
6 (VOL-) Button Press to reduce a value in the menu
(such as decreasing the volume).
7 (VOL+) Button Press to increase a value in the menu
(such as increasing the volume).
8 Dome Light switch Slide the switch to select the light ON, OFF or DOOR activated. See note below.
9 Panel Open Button Press to open the LCD panel.
10 Button Press to skip the previous chapter on DVD or track on CD; Press and hold it to fast
reverse playback at 2x, 4x, 8x, 16x and 32x speeds.
11 Button Press to skip the next chapter on DVD or track on CD; Press and hold it to fast forward
playback at 2x, 4x, 8x, 16x and 32x speeds
12 Stop button Press to stop playback, press [PLAY] or [ENTER] button to start playing at the last
position; Press [STOP] button twice to fully stop playback, Press [PLAY] or [ENTER] button
to start playing at the beginning of DVD.
13 Press to Play or Pause a disc.
14 Eject button Press to Eject the disc.
15 IR window Receives IR signals from the remote control and sends IR signals to IR wireless
headphone.
16 Fixing holes Connect the player to the mounting plate with screws inserted into these holes.
17 LCD Shut Off switch Press to turn off the LCD screen
DVD PLAYER CONTROLS & FUNCTIONS
18 Disc slot Insert the disc into this slot.
Play or Pause
Item
Name
Function or control
1
Power
Press to turn the OHM107VD On or Off.
2
Setup
Press to access the setup menu to modify the DVD player settings.
3
Mute
Press to turn the Sound On or Off.
4
Eject
Press to Eject the disc.
5
0-9
Press to enter Track Numbers directly or
for changing some settings.
6
Previous
Press to go to the Previous Chapter on DVD
or Track on CD.
7
Play or
Pause
Press to Play or Pause the CD or DVD.
8
Audio
DVD: Press to change the Audio Language during DVD playback.
VCD/CD: Press to change the Audio Channel (Left, Right, Stereo) during VCD / CD playback.
9
Arrows and ENTER
buttons
Press to navigate in a DVD Menu and change setting values in the Display Menu.
10
Skip back
Press to Fast Reverse playback at 2x, 4x, 8x,16x and 32x speeds.
11
Random
Press to play chapters or tracks in random order.
12
A-B
Press to repeat playback from point A to point B.
13
SRC
Press to select the desired Video Input Mode (DVD-IN, AV IN1 and AV IN2).
14
Return
Press to return the main menu, press again to return the last position of playback.
15
Angle
Press to select a different filming Angle.
Please note that this feature only works if the DVD is recorded with multiple angles.
16
Zoom
Press to set the Zoom for movie viewing.
17
Repeat
DVD Repeat: Press 1x Chapter, 2x Title, 3x All.
CD Repeat: Press 1x Track, 2x All.
18
Title
Press to view the DVD disc’s Title Menu.
19
Skip forward
Press to Fast Forward playback at 2x, 4x, 8x,16x and 32x speeds.
20
Subtitle
Press to select and turn on DVD Subtitles during playback.
21
Menu
Press to view the DVD Main Menu.
Press and hold it to display the Display Menu.
22
VOL - / VOL+
Press to Decrease / Increase the volume.
23
Next
Press to go to the next Chapter on DVD or Track on CD.
24
Stop
Press to stop playback, press [PLAY] or [ENTER] button to start playing at the last position;
Press [STOP] button twice to fully stop playback, Press [PLAY] or [ENTER] button to start
playing at the beginning of DVD.
25
Display
Press to Display the Playback Information-
(Title, Chapter, Track and Time).
REMOTE CONTROL FUNCTIONS
26
Go To
Press to Start Playback at a selected Chapter, Track or Time.
This function can be operational only when the green wire of the dome light is connected to the door sensor and the polarity switch is set to the
correct position (Refer Page 16). Please refer to the vehicle’s wiring manual for the correct connection details.
