


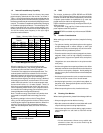

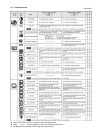
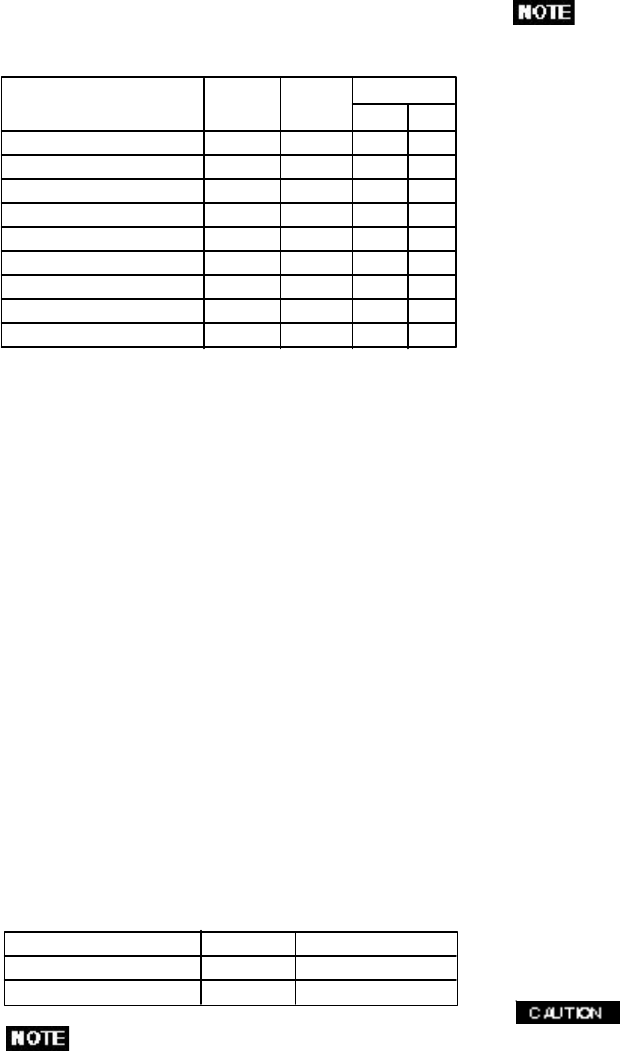
PRESET Polarity
TIMING Fh(kHz) Fv (Hz) H V
640 x 480 N.I. 31.47 60.0 – –
1024 x 768 N.I. 60.02 75.0 + +
1024 x 768 N.I. 68.68 85.0 + +
1280 x 1024 N.I. 79.98 75.0 + +
1280 x 1024 N.I. 91.15 85.0 + +
1600 x 1200 N.I. 93.75 75.0 + +
1600 x 1200 N.I. 106.25 85.0 + +
1800 x 1350 N.I. 120.4 85.0 – –
1920 x 1440 N.I. 112.5 75.0 – +
1.3 Power Management Function
When the monitor is in its normal operating mode
(without USB operation), the monitor utilizes less than
140 watts of power and the Power LED is green.
The monitor also supports a reduced power state. The
reduced power state will be entered into if the monitor
detects the absence of either the horizontal sync signal
and/or the vertical sync signal. Upon detecting the
absence of these signals, the monitor screen is blanked,
the backlight is turned off, and the Power LED is turned
amber. When the monitor is in the reduced power state,
the monitor will utilize < or = 3 watts of power. There is a
brief warm up period before the monitor will return to its
normal operating mode. Refer to your computer manual
for instructions on setting energy saver features (some-
times called power management features).
Note: The above energy saver feature only works when
connected to computers that have energy saver fea-
tures.
By selecting settings in the monitor's Energy Saver
utility, you can also program the monitor to enter into the
reduced power state at a predetermined time. When the
monitor's Energy Saver utility causes the monitor to
enter the redcuced power state, the Power LED blinks
amber.
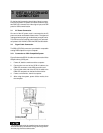
1.5 Location Considerations
When setting up and using the monitor, keep the following
in mind:
• For optimum viewing, avoid placing the monitor against
a bright background or where sunlight or other light
sources may reflect on the display area of the monitor.
Place the monitor just below eye level.
• Place the monitor away from strong magnetic or electro-
magnetic fields, such as high capacity transformers,
electric motors, large current power lines, steel pillars,
etc....
Magnetism can cause distortion in the picture and/or
color purity.
• Avoid covering the slots or openings of the monitor. Allow
adequate ventilation around the monitor so the heat from
the monitor can properly dissipate. Avoid putting the
monitor into any enclosure that does not have adequate
ventilation.
• Avoid exposing the monitor to rain, excessive moisture,
or dust, as this can cause a fire or shock hazard.
• Avoid placing the monitor, or any other heavy object, on
the power cord. Damage to the power cord can cause a
fire or electrical shock.
• When transporting the monitor, handle it with care.
1.6 Cleaning Your Monitor
When cleaning the monitor, please follow these guidelines:
• Always unplug the monitor before cleaning.
• Wipe the screen and cabinet front and sides with a soft
unspoil cloth to prevent causing imperfections.
• If the screen requires more than dusting, apply water or
neutral detergent to a soft cloth to clean the monitor
screen.
• Do not use benzene, thinner or any volatile sub-
stances to clean the unit as the finish may be
permanently marked.
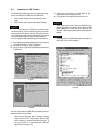
1.2 Internal Preset Memory Capability
To minimize adjustment needs, the factory has preset
popular display standards into the monitor, as shown in
Table 1. If any of these display standards are detected, the
picture size and position are automatically adjusted. All of
the factory presets may be overwritten by adjusting the user
controls. This monitor is capable of automatically storing up
to 15 additional display standards. The new display infor-
mation must differ from any of the existing display stan-
dards by at least 1kHz for the horizontal scan frequency or
1Hz for the vertical scan frequency or the sync signal
polarities must be different.
Table 1. Memory Buffer Factory Presets
Mode Power Power-On Indicator
Normal 140 W Green
Power Saving Mode < or = 3 W Amber
without USB operation
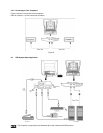
1.4 DDC
The monitor includes the VESA DDC2B and DDC2Bi
feature. DDC (Display Data Channel) is a communication
channel over which the monitor automatically informs the
computer system about its capabilities (e.g. each sup-
ported resolution with its corresponding timing).
DDC is routed through previously unused pins of the 15-pin
VGA connector.
The system will “Plug and Play” if both monitor and com-
puter implement the DDC protocol.
DDC2Bi is available only with connector SIGNAL-
B.