


6. RAID Controller
68
SPI-8451-LLVA, SPI-8452-LLVA, SPI-8451-LVA
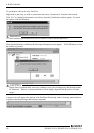
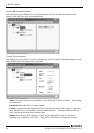
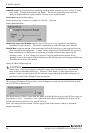
Schedule event
drop down box allows scheduling synchronization by minute, by hour, by day, by week,
or by month. If enabled, the default is By Month. This allows synchronization to take place
during an off-hour when the system is either not in use or not at peak demand.
Start time
designates hr/min/ am/pm
On the designate day of week or by ordinal (1st, 2nd, 3rd....) selection.
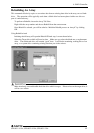
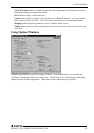
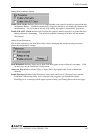
Setting Rebuild Options
Disable Hot Spare/Auto Rebuild
checkbox turns off the use of a “hot” spare drive and automatic
rebuilding of a mirrored array. The default is unchecked (or enable Hot Spare/Auto Rebuild).
Rebuild Rate
assigns the amount of importance that FastTrak100-Lite gives to mirroring data from one
drive to another in the background. A “high” setting assigns most of FastTrak100-Lite’s resources
to the rebuild process at the expense of responding to ongoing read/write data requests by the
operating system. A “low” setting gives priority to ongoing read/write data requests by the
operating system at the expense of the rebuild process and will typically result in longer rebuild times.
The setting shown above is the default.
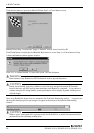
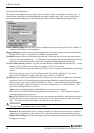
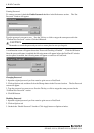
Setting PCI Bus Utilization Option
CAUTION
In most cases, a user does not need to change this setting since FastTrak100-Lite’s data handling
rarely conflicts with another PCI device. However, certain brands of video capture cards can
produce a “glitch” on play back of A/V files that may require adjusting the default setting devices
(see Tips for Audio/Video Editing for more information).
This section of the Options Window allows a user to change how much time the FastTrak100-Lite holds
on to the PCI bus to transfer data.
The default setting of “High” on the slider bar means FastTrak100-Lite holds on to the PCI bus longer for
data transfers to occur. A setting of “Less” reduces the time which FastTrak100-Lite occupies on the
PCI bus and frees that time for use by other PCI devices.
Once a bus setting has been selected, click the Apply button on the Options window to implement
changes immediately.