


CyberPower Network Management System
2
INSTALLATION GUIDE
Step 1. Hardware and Tool Installations
1. Connect the Ethernet cable to the LAN port of the CyberPower Network Management Card.
2. Connect the CyberPower Network Management Card to the UPS communication port
(serial port). The included serial cable may be used if needed.
3. Connect the supplied AC adapter (for select UPS models only) to the Network Management Card
Adapter and plug into the wall socket.
4. Press the Reset Button on the Network Management Card continuously for 7 seconds to ensure the
IP Address is set to its default value.
5. Double click the “SNMP Card Configuration Tool” installation file, “Setup.exe” from
“\tools\wsnmpcfg” folder In CDROM drive.
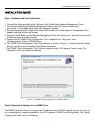
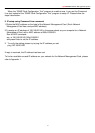
6. The “SNMP Card Configuration Tool” Setup Wizard is shown as Figure. 1. Please follow the “Setup
Wizard” instruction until completes the software installation.
7. The “SNMP Card Configuration Tool” folder will appear under “All Programs” folder (under “My
Computer”) when you install successfully.
Figure 1. The SNMP Card Configuration Tool Setup Wizard.
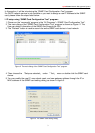
Step 2. Setup the IP address for the SNMP Card.
The SNMP Card will initially try to acquire an IP address from the DHCP network service. You can run
the “wsnmpcfg.exe” program (available in the “All Programs”>“SNMP Card Configuration Tool” folder)
to display the card’s current IP address.