


5
CHAPTER
2
Installation
The DSR switching system transmits keyboard, video and mouse (KVM) information between
operators and target devices attached to the DSR switch over a network using either an Ethernet
connection or a modem connection.
The DSR switch uses TCP/IP for communication over Ethernet. Although 10BaseT Ethernet may
be used, Avocent recommends a dedicated, switched 100BaseT network, or even a
1000BaseT network.
The DSR switch uses the Point-to-Point Protocol (PPP) for communication over a V.34, V.90 or
V.92 modem.
KVM switching tasks can be performed through either a DSView 3 software server or the web
server built into the switch. The installation instructions in this chapter pertain to the hardware
installation and configuration of the DSR switch and the built in web server. If you plan to use the
DSView 3 software for access, please refer to the DSView 3 software Quick Install Guide included
with the DSView 3 software package.
Installation Overview
The general procedure for setting up and installing the DSR switch is as follows:
• Unpack the DSR switch and verify that all components are present and in good condition. See
the Getting Started section in this chapter.
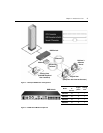
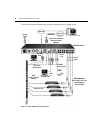
• Make all hardware connections between the power source, DSR switch, target devices,
optional SPC device, the Ethernet and the optional modem connection. See the Connecting the
DSR Switch Hardware section.
• Turn on the power and verify that all connections are working. See the Verifying the
Connections section.
• If you are accessing the switch through the built in web server, or configuring the DSR switch
using the console menu interface, configure it now. Otherwise, you’ll use the DSView 3
software to configure the DSR switch. See the DSView software online help for detailed
instructions. For instructions on using the console menu interface, see Chapter 4 for
more information.
• Turn off the mouse acceleration function on all attached computers.