


9-8 Dell PowerEdge 6100/200 System Installation and Troubleshooting Guide
14. Perform a tape backup and verification test with
the drive as instructed in the tape-drive software
documentation that came with the drive.
If the controller card is an Industry-Standard
Architecture (ISA) or Extended Industry-Standard
Architecture (EISA) expansion card, run the system
configuration utility and update the system configura-
tion. See Chapter 5, “Using the System Configuration
Utility,” in the User’s Guide for instructions on run-
ning the utility and saving the configuration
information.
NOTE: You do not need to update the system config-
uration information for a tape drive attached to its
own controller card.
I
nstalling an External Tape Drive That
Uses a Controller Card
Complete the following procedure to install an external
tape drive that uses a controller card and shielded inter-
face/DC power cable:
1. Prepare the tape drive and controller card for
installation.
Ground yourself by touching an unpainted metal sur-
face on the back of the computer. Unpack the tape
drive and controller card, and configure them for the
system according to the instructions in the documen-
tation that came with the tape drive.
2. Remove both computer covers and the front bezel.
See “Removing the Computer Covers” and “Remov-
ing the Front Bezel” in Chapter 7.
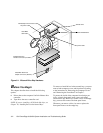
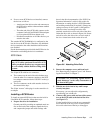
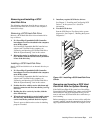
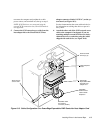
3. Attach the drive rails to the drive, if necessary
(see Figure 9-6).
4. Install the controller card in an expansion slot.
See “Installing an Expansion Card” in Chapter 8.
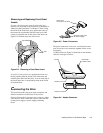
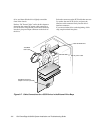
5. Connect the tape drive’s interface/DC power
cable to the external connector on the controller
card; secure the connection by tightening the
screws on the connector.
6. Replace the computer covers and front bezel.
7. Reconnect the computer and peripherals to their
power sources, and turn them on.
8. Perform a tape backup and verification test with
the drive as instructed in the tape-drive software
documentation that came with the drive.
CAUTION: See “Protecting Against Electro-
static Discharge” in the safety instructions at
the front of this guide.