


Setting Up and Using Your Computer 33
NOTE: If you do not see an Actions menu option, you have not yet set your computer to RAID-enabled
mode (see page 30).
3
On the
Actions
menu, select
Create RAID Volume
to launch the Create RAID Volume
Wizard.
4
Click
Next
at the first screen.
5
Confirm the volume name, select
RAID 1
as the RAID level, and then click
Next
to continue.
6
On the
Select Volume Location
screen, click the first hard drive you want to use to create
your RAID level 0 volume, and then click the right arrow. Click a second hard drive until two
drives appear in the
Selected
window, and then click
Next
.
7
In the
Specify Volume Size
window, select the
Volume Size
desired and click
Next
.
8
Click
Finish
to create the volume, or click
Back
to make changes.
9
Follow Microsoft Windows procedures for creating a partition on the new RAID volume.
Deleting a RAID Volume
NOTE: While this procedure deletes the RAID 1 volume, it also splits the RAID 1 volume into two non-
RAID hard drives with a partition, and leaves any existing data files intact. Deleting a RAID 0 volume,
however, destroys all data on the volume.
1
Click the
Start
button and point to
Programs
→
Intel(R) Application Accelerator
→
Intel
Matrix Storage Manager
to launch the Intel
®
Storage Utility.
2
Right-click the
Volume
icon of the RAID volume you want to delete, and select
Delete Volume
.
3
On the
Delete RAID Volume Wizard
screen, click
Next
.
4
Highlight the RAID volume you want to delete in the
Available
box, click the right-arrow
button to move the highlighted RAID volume into the
Selected
box, and then click
Next
.
5
Click
Finish
to delete the volume.
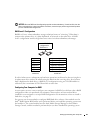
Migrating to a RAID Level 0 Configuration
1
Set your computer to RAID-enabled mode (see page 30).
2
Click the
Start
button and point to
All Programs
→
Intel(R) Application Accelerator
→
Intel
Matrix Storage Manager
to launch the Intel
®
Storage Utility.
NOTE: If you do not see an Actions menu option, you have not yet set your computer to RAID-enabled
mode (see page 30).
3
On the
Actions
menu, select
Create RAID Volume From Existing Hard Drive
to
launch the
Migration Wizard.
4
Click
Next
on the Migration Wizard screen.
5
Enter a RAID volume name or accept the default.