


System Board: Dell Latitude C610/C510 Service Manual
file:///C|/Work%20Area%20-%20A/E%20DOC%20Posting/latc610/service%20manual/sysboard.htm[2/1/2013 11:00:52 AM]
Back to Contents Page
System Board
Dell™ Latitude™ C610/C510 Service Manual
Removing the System Board
Replacing the System Board
Removing the System Board
The system board's BIOS chip contains the service tag sequence, which is also visible on a barcode label on the bottom of the
computer. The replacement kit for the system board includes a CD that provides a utility for transferring the service tag
sequence to the replacement system board.
NOTICE: Disconnect the computer and any attached devices from electrical outlets, and remove any installed
batteries.
NOTICE: To avoid ESD, ground yourself by using a wrist grounding strap or by touching an unpainted metal surface on
the computer.
NOTICE: Read "Preparing to Work Inside the Computer" before performing the following procedure.
1. Remove the hard drive
.
2. Remove the keyboard
.
3. Remove the display assembly
.
4. Remove the palm rest
.
5. Remove the microprocessor thermal cooling assembly
.
6. Remove the microprocessor
.
7. Remove the modem
, memory modules, and Mini PCI card.
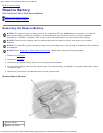
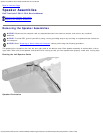
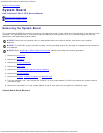
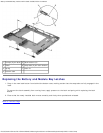
8. Turn the computer over, and remove the six M2.5 x 5-mm screws labeled "circle B" that secure the system board to
the bottom case.
9. Remove the three M2.5 x 5-mm screws labeled "circle B" that secure the fan guard to the bottom case.
System Board Screw Removal