


www.dell.com | support.dell.com
26 Using Your Projector
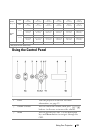
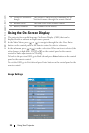
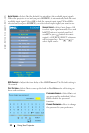
8 Video mode The Dell 5100MP Micro-projector has preset
configurations that are optimized for displaying
data (PC Graphics) or video (movies, games,
etc.). Press Video Mode button to toggle between
PC mode, Movie mode, Game Mode, sRGB, or
User mode (for user to setup and save preferred
settings). Pressing the Video Mode button once
will show the current display mode. Pressing the
Video Mode button again will switch between
modes.
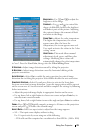
9 Auto Adjust Press to synchronize the projector to the input
source. Auto Adjust does not operate if the OSD
(On-Screen Display) is displayed.
10 Blank screen Press to hide the image, press again to resume
display of the image.
11 Auto keystone Press to enable the auto correction for image
distortion due to tilting the projector.
12 LED light LED indicator.
13 Up button Press to select OSD items.
14 Enter button Press to confirm the selection.
15 Press to adjust the OSD setting.
16 Menu Press to activate the OSD.
17 Down button Press to select OSD items.
18 Page Press to move to previous page.
19 Page Press to move to next page.
20 PC/Mouse control The PC/Mouse control can be used to control
mouse movement. The mouse function is
enabled using the M1 cable to connect your
computer and the projector.
21 Left click Mouse left click.
22 Source Press to switch between Analog RGB, Digital
RGB, Composite, Component-i, S-video, and
Analog YPbPr sources.
23 Keystone correction Press to correct the image distortion.
24 PIP Press the PIP button to turn on/off the PIP
screen.