


44 Installing Enclosure Components
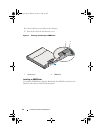
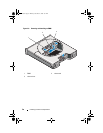
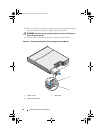
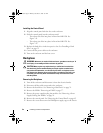
Installing the Control Panel
1
Align the control panel with the slot on the enclosure.
2
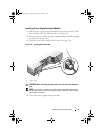
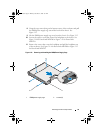
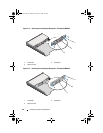
Slide the control panel into the enclosure until:
– The release tab clicks into place in
PowerVault MD1200
. See
Figure 3-11.
– The release pin clicks into place in
PowerVault MD1220
. See
Figure 3-12.
3
Replace the hard drives in their respective slots. See "Installing a Hard
Drive" on page 32.
4
Connect all the power cables to the enclosure.
5
Turn on the enclosure and the host server.
Backplane
WARNING: Whenever you need to lift the enclosure, get others to assist you. To
avoid injury, do not attempt to lift the enclosure by yourself.
CAUTION: Many repairs may only be done by a certified service technician.
You should only perform troubleshooting and simple repairs as authorized in
your product documentation, or as directed by the online or telephone service
and support team. Damage due to servicing that is not authorized by Dell is not
covered by your warranty. Read and follow the safety instructions that came
with the product.
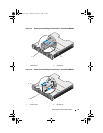
Removing the Backplane
1
Turn off the enclosure and disconnect it from the electrical outlet.
2
Disconnect all the cables connected to the enclosure.
3
Remove the hard drives. See "Removing a Hard Drive" on page 31.
4
Remove the EMMs. "Removing an EMM" on page 37.
5
Remove the power supply/cooling fan modules. See "Removing a Power
Supply/Cooling Fan Module" on page 39.
6
Remove the control panel. See "Removing the Control Panel" on page 42.
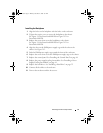
7
Remove the screws that secure the EMM/power supply cage to the chassis.
book.book Page 44 Monday, December 7, 2009 4:51 PM