


Installing Enclosure Components 35
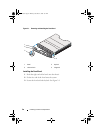
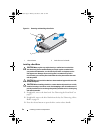
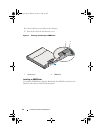
Installing a Hard Drive Into a Drive Carrier
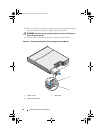
1 Insert the hard drive into the hard-drive carrier with the connector end
of the drive at the back. See
Figure 3-5.
2 Align the screw holes on the hard drive with the back set of holes on the
hard-drive carrier.
When aligned correctly, the back of the hard drive is flush with the back of
the hard-drive carrier.
3
Attach the four screws to secure the hard drive to the hard-drive carrier.
Enclosure Management Module
An enclosure with redundant enclosure management contains two enclosure
management modules (EMM) and can be configured in either unified mode
or split mode. An enclosure with non-redundant enclosure management
consists of only one EMM in unified mode. If only one EMM is installed in
your enclosure, it must be installed in EMM 0. You must install the EMM
blank in EMM 1.
CAUTION: EMMs can be removed and installed without turning off the enclosure.
It is recommended that you do not remove the EMM while data is being
transferred. Replacing or installing an EMM that is connected to a host server
causes it to loose communication with the enclosure and requires a reboot of the
host server.
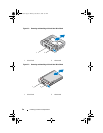
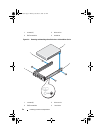
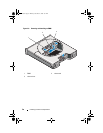
Removing an EMM Blank
CAUTION: To maintain proper system cooling, you must install an EMM blank in
the empty slot.
1
Turn off the enclosure and host server.
2
Disconnect all the power cables connected to the enclosure.
3
Remove EMM 0. See "Removing an EMM" on page 37.
4
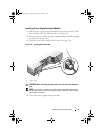
To remove the EMM blank, press down on the release latch and pull the
blank away from the enclosure. See Figure 3-7.
5
Install an EMM in EMM 0 and EMM 1. See "Installing an EMM" on
page 39.
book.book Page 35 Monday, December 7, 2009 4:51 PM