


book.book Page 117 Wednesday, October 10, 2012 10:32 PM
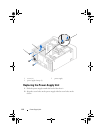
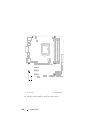
Replacing the System Board
1
Gently place the system board into the chassis and slide it towards the
back of the computer.
2
Replace the screws that secure the system board to the chassis.
3
Route and connect the cables that you disconnected from the system
board.
NOTE: For information on system board connectors, see "System-Board
Components" on page 21.
Postrequisites
1
Replace the processor. See "Replacing the Processor" on page 103.
2
Replace the processor fan and heat-sink assembly. See "Replacing the
Processor Fan and Heat-Sink Assembly" on page 99.
3
Replace the graphics card. See "Replacing the Graphics Card" on page 39.
4
Replace any PCI-Express x1 card(s), if applicable. See "Replacing the PCI-
Express x1 Card(s)" on page 46.
5
Replace the memory module(s). See "Replacing Memory Module(s)" on
page 28.
6
Replace the Mini-Card, if applicable. See "Replacing the Mini-Card" on
page 51.
7
Replace the computer cover. See "Replacing the Computer Cover" on
page 25.
8
Follow the steps in "After Working Inside Your Computer" on page 15.
Entering the Service Tag in BIOS
1
Turn on the computer.
2
Press <F2> during POST to enter the system setup program.
3
Navigate to the main tab and enter the service tag in the
Service Tag
Setting
field.
NOTE: Set Service Tag field allows you to enter the service tag manually only when
the service tag is absent.
System-Board 117