


book.book Page 58 Wednesday, October 10, 2012 10:32 PM
2
1
3
4
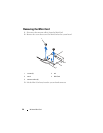
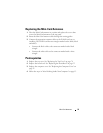
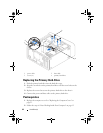
1 mSATA drive 2 screws (2)
3 notch 4 tab
Replacing the mSATA Drive
CAUTION: The connectors are keyed to ensure correct insertion. Use of
excessive force may damage the connectors.
CAUTION: To avoid damage to the mSATA drive, ensure that there are no cables
under the mSATA drive.
1
Align the notch on the mSATA drive with the tab in the system-board
connector.
2
Insert the mSATA drive at a 45-degree angle into the system-board
connector.
3
Press the other end of the mSATA drive down into the slot on the system
board and replace the screws that secure the mSATA drive to the system
board.
mSATA Drive 58