


Edgeport Installation Guide (90000403 Rev. D) – Page 9
To install the USB stack and Edgeport drivers:
1. Insert the “Edgeport Driver” CD into your CD-ROM drive.
2. When the welcome dialog appears, click the “Install Driver” button.
Once the driver installation program has begun, follow the on screen instructions.
3a. If you are installing drivers for the first time: An Information dialog informs you that the installation
was successful. After clicking “OK”, the installation is complete.
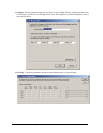
3b. If you are replacing existing Edgeport drivers: Follow the on-screen instructions. Note that, before
beginning the installation of the drivers, all applications with open ports must be closed and all USB
devices unplugged. If you close all the applications and unplug all the USB devices, then you will not need
to reboot for the new drivers to take effect immediately. If any applications are left open or USB devices
plugged in, you may choose to abort the installation or to continue and be required to reboot before the
upgrade can take effect.
Note that because Windows NT 4.0 is not Plug-and-Play, you will not see a pop-up dialog box indicating that new
hardware has been found. You may verify correct installation with the Edgeport Utility (see page 12) or the USB
Status Utility (Viewer), as described below.
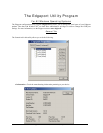
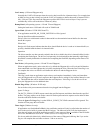
The USB Status Utility can be accessed by clicking the USB icon in your system tray or by clicking on Start,
Programs, Inside Out Networks Utilities, USB Status Utility. This utility lists all the USB devices installed on your
PC and provides other relevant information for each device. You may also use this utility to create a log file.
For Windows 95
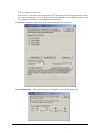
1. After connecting the USB cable, the Update Device Driver Wizard dialog appears. Click "Next" to
continue.
2. Insert the "Edgeport Driver" CD into your CD-ROM drive.
3. After Windows fails to locate the drivers on your floppy disk drive, click "Other Locations...".
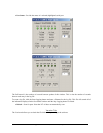
4. When the Select Other Location dialog appears, type <CD drive letter>:\Win95 and click "OK".
5. Confirm that Windows has found the correct driver location and click "Finish".
6. When Windows prompts you for the driver disk, click "OK".
7. At the next Windows prompt, type <CD drive letter>:\Win95 and click "OK".
Installation is complete when no more dialogs appear. Your new COM port(s), numbered sequentially following the
existing ports in your system, is/are ready.