


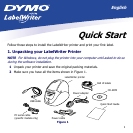
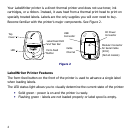

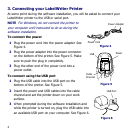
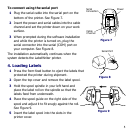
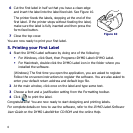
6
6 Cut the first label in half so that you have a clean edge
and insert the label into the label feed slot. See Figure 10.
The printer feeds the labels, stopping at the end of the
first label. If the printer stops without feeding the label,
make sure the label is fully inserted and then press the
form-feed button.
7 Close the top cover.
You are now ready to print your first label.
5. Printing your First Label
1 Start the DYMO Label software by doing one of the following:
• For Windows, click Start, then Programs>DYMO Label>DYMO Label.
• For Macintosh, double-click the DYMO Label icon in the folder where you
installed the software.
(Windows) The first time you open the application, you are asked to register.
Follow the on-screen instructions to register the software. You are also asked to
enter your default return address and default logo file.
2 At the main window, click once on the label and type some text.
3 Choose a font and a justification setting from the Formatting toolbar.
4 Click to print the label.
Congratulations! You are now ready to start designing and printing labels.
For complete details on how to use the software, refer to the
DYMO Label Software
User Guide
on the DYMO LabelWriter CD-ROM and the online Help.
Figure 10